


3
Table of Contents
Demonstration Mode
The demonstration will activate the first time you
turn on the power. When the demonstration starts,
the following message appears in the display
twice:
“Now Demonstration Mode!! To finish the
demonstration, please press POWER KEY while
this message appears in the display. Thank you!”
To cancel the demonstration
Press ?/1 to turn the receiver off during the
previous message. The next time you turn the
receiver on, the demonstration will not appear.
To view the demonstration
Hold down SET UP and press ?/1 to turn on the
power.
Note
Running the demonstration will clear the
receiver’s memory. For details on what will be
cleared, see “Clearing the receiver’s memory” on
page 16.
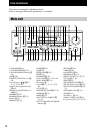
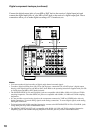
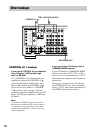
Parts Identification
Main unit ............................................... 4
Hooking Up the Components
Required cords....................................... 5
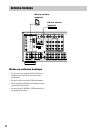
Antenna hookups ................................... 6
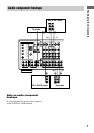
Audio component hookups.................... 7
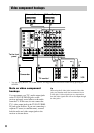
Video component hookups .................... 8
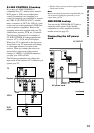
Digital component hookups................... 9
Multi channel input hookups ............... 11
Other hookups ..................................... 12
Hooking Up and Setting Up
the Speaker System
Speaker system hookups ..................... 15
Performing initial setup operations ..... 16
Multi channel surround setup .............. 17
Checking the connections.................... 22
Basic Operations
Selecting the component ..................... 23
Listening to the sound
in another room ............................. 25
Changing the display ........................... 25
Enjoying Surround Sound
Selecting a sound field ........................ 26
Understanding the multi channel
surround displays .......................... 30
Customizing sound fields .................... 31
Receiving Broadcasts
Direct tuning ........................................36
Automatic tuning ................................. 36
Preset tuning ........................................ 37
Other Operations
Naming preset stations and program
sources ...........................................38
Recording ............................................ 38
Using the Sleep Timer ......................... 39
Adjustments using
the SET UP button ........................ 40
CONTROL A1
control system ......... 41
Additional Information
Precautions .......................................... 44
Troubleshooting................................... 44
Specifications ...................................... 47
Tables of settings using SURR, LEVEL,
EQ, and SET UP buttons............... 49
Adjustable parameters for each sound
field ............................................... 52