


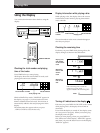


Recording From CDs
16
EN
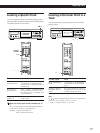
Useful Tips for Recording
Using these functions makes recording CDs more
convenient.
PEAK SEARCH
AUTO SPACE
♦
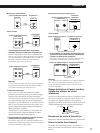
Adjusting the recording level (Peak Search)
The player locates the highest level among the tracks to
be recorded to let you adjust the recording level before
you start recording.
1 Before you start playing, press PEAK SEARCH.
“PEAK” flashes in the display and the player
repeats the portion of the highest level.
2 Adjust the recording level on the deck.
3 Press ♦ on the player to stop Peak Search.
“PEAK” disappears from the display.
Note
The portion with the highest level may differ every time you
try the adjustment on the same disc. The difference is,
however, so slight that you won’t find any problem in
adjusting the recording level precisely.
Locating each track on a tape using the
AMS function (Auto Space)
The Auto Space function inserts a blank space of 3
seconds between each track while playing, and enables
you to locate each track using the AMS function of the
deck.
Before you start playing, press AUTO SPACE.
“AUTO SPACE” appears in the display.
To cancel Auto Space
Press AUTO SPACE until “AUTO SPACE” disappears from
the display.
Note
If you use the Auto Space function when recording, for
example, a medley or symphony, the sound may be
interrupted where the track number changes. It happens
when the track numbers are assigned in the middle of the
piece.
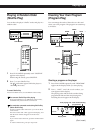
2 Press ✴ or ✭ to specify the playing time.
Each time you press these buttons, the display
changes as shown below, with the playing time of
one side following each indication.
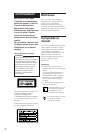
♠ HALF C-46 C-54 C-60 C-74 C-90 - -. - - ▼
(23.00) (27.00) (30.00) (37.00) (45.00)
When you select “HALF”
The player sets the playing time to a half of the total
playing time.
3 Press ✬ to start playing.
At the specified time the play fades out and the
player pauses. “B” in the
B
indication appears
in the display.
4 To record on side B, reverse the tape and press ✬
or ❖ on the player to resume playing.
Again, the play fades out at the specified time.
To cancel Time Fade
Press EDIT/TIME FADE.
You can freely specify the playing time
See “You can freely specify the tape length” on page 15.
You can change discs during Time Fade
If the play ends before the specified fade-out time, (for
example, when you record CD-singles on a tape) change
the disc. The specified fade-out time is counted only
during playing.
You can fade in to resume playing in Step 4
After you reverse the tape, press FADER.
Note
If you press ✴ or ✭ during Time Fade Play, Time Fade
will be cancelled.