


14
GB
Recording to an MD
Recording to
MDs
This chapter explains the various ways
to record to an MD, as well as how to
mark track numbers and perform
synchro-recording with other
components. See also “System
limitations” on page 47 before
recording.
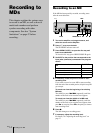
Recording to an MD
If the MD has been partially recorded, recording starts
after the recorded tracks.
1
Turn on the amplifier and program source, and
select the source on the amplifier.
2
Press ?/1 to turn on the deck.
The STANDBY indicator turns off.
3
Press OPEN/CLOSE A to open the disc tray and
insert a recordable MD.
To close the disc tray, press OPEN/CLOSE
A
again.
4
Set INPUT to the position that corresponds to the
input jacks (connector) connected to the program
source.
5
If necessary, locate the point on the MD to start
recording from.
If you want to record to a new MD or start recording
from the end of the recorded portion, skip this step and
go to step 6.
To record over from the beginning of an existing
MD track
Turn AMS (or press
.
/
>
repeatedly) until the
number of the track to be recorded over appears.
To record over from the middle of an MD track
Turn AMS (or press
.
/
>
repeatedly) until the
number of the track to be recorded over appears, then
press
N
to start play. Press
X
at the point you want to
start recording from.
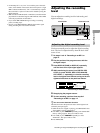
6
Press z.
The deck changes to recording pause.
7
If necessary, adjust the recording level.
For details, see “Adjusting the recording level” on
page 17.
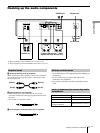
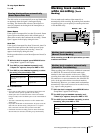
When the source is connected to
the
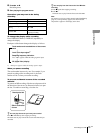
Set INPUT to
DIGITAL IN OPT1 connector OPT1
DIGITAL IN OPT2 connector OPT2
DIGITAL IN COAXIAL jack COAX
ANALOG IN jacks ANALOG
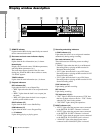
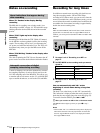
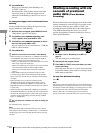
AMS
INPUT
N
OPEN/CLOSE A
Xz
?/1