


MDS-JE320
— 20 —
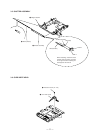
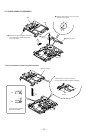
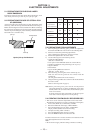
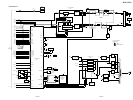
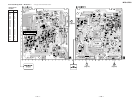
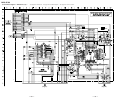
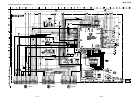
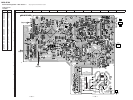
5-11. ADJUSTING POINTS AND CONNETING POINTS
[BD BOARD] (SIDE A)
NOTE : It is useful to use the jig. for checking the waveform.
(Refer to Servicing Note on page 4.)
1
5
CN110
NOTE
I + 3V
IOP
TEO
VC
RF
CN101
D101
IC192
— 19 —
5-8. FOCUS BIAS ADJUSTMENT
Adjusting Method :
1. Load a continuously recorded disc (Refer to “5-4. Creating
Continuously Recorded Disc”.).
2. Rotate the AMS knob and display “CPLAY MODE”.
3. Press the YES button and display “CPLAY MID”.
4. Press the EDIT/NO button when “C1 = AD = ” is
displayed.
5. Rotate the AMS knob and display “FBIAS ADJUST”.
6. Press the YES button and display “ / a = ”.
The first four digits indicate the C1 error rate, the two digits
after [/] indicate ADER, and the 2 digits after [a =] indicate the
focus bias value.
7. Rotate the AMS knob in the clockwise direction and find the
focus bias value at which the C1 error rate becomes 220 (Refer
to Note 2).
8. Press the YES button and display “ / b = ”.
9. Rotate the AMS knob in the counterclockwise direction and
find the focus bias value at which the C1 error rate becomes
220.
10. Press the YES button and display “ / c = ”.
11. Check that the C1 error rate is below 50 and ADER is 00. Then
press the YES button.
12. If the “( )” in “ - - ( )” is above 20, press the YES
button.
If below 20, press the EDIT/NO button and repeat the adjustment
from step 2.
13. Press the §EJECT button to remove the continuously recorded
disc.
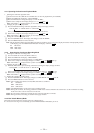
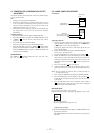
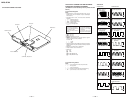
Note 1 : The relation between the C1 error and focus bias is as
shown in the following figure. Find points a and b in the
following figure using the above adjustment. The focal
point position C is automatically calculated from points a
and b.
Note 2 : As the C1 error rate changes, perform the adjustment using
the average vale.
220
C1 error
bc
a
Focus bias value
(F. BIAS)
5-9. ERROR RATE CHECK
5-9-1. CD Error Rate Check
Checking Method :
1. Load a check disc (MD) TDYS-1.
2. Rotate the AMS knob and display “CPLAY MODE”.
3. Press the YES button twice and display “CPLAY MID”.
4. The display changes to “C1 = AD = ”.
5. Check that the C1 error rate is below 20.
6. Press the EDIT/NO button, stop playback, press the §EJECT
button, and remove the test disc.
5-9-2. MO Error Rate Check
Checking Method :
1. Load a continuously recorded disc (Refer to “5-4. Creating
Continuously Recorded Disc”.).
2. Rotate the AMS knob and display “CPLAY MODE”.
3. Press the YES button and display “CPLAY MID”.
4. The display changes to “C1 = AD = ”.
5. If the C1 error rate is below 50, check that ADER is 00.
6. Press the EDIT/NO button, stop playback, press the §EJECT
button, and remove the continuously recorded disc.
5-10. FOCUS BIAS CHECK
Change the focus bias and check the focus tolerance amount.
Checking Method :
1. Load a continuously recorded disc (Refer to “5-4. Creating
Continuously Recorded Disc”.).
2. Rotate the AMS knob and display “CPLAY MODE”.
3. Press the YES button twice and display “CPLAY MID”.
4. Press the EDIT/NO button when “C1 = AD = ” is
displayed.
5. Rotate the AMS knob and display “FBIAS CHECK”.
6. Press the YES button and display “ / c = ”.
The first four digits indicate the C1 error rate, the two digits
after [/] indicate ADER, and the 2 digits after [c =] indicate the
focus bias value.
Check that the C1 error is below 50 and ADER is 00.
7. Press the YES button and display “ / b = ”.
Check that the C1 error is not below 220 and ADER is not
above 00 every time.
8. Press the YES button and display “ / a = ”.
Check that the C1 error is not below 220 and ADER is not
above 00 every time.
9. Press the EDIT/NO button, next press the §EJECT button,
and remove the continuously recorded disc.
Note 1 : If the C1 error and ADER are above 00 at points a (step 8.
in the above) or b (step 7. in the above), the focus bias
adjustment may not have been carried out properly. Adjust
perform the beginning again.