


9
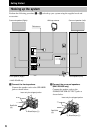
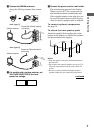
Getting Started
Setting the time
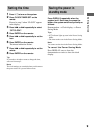
1 Press ?/1 to turn on the system.
2 Press CLOCK/TIMER SET on the
remote.
Proceed to step 5 when “CLOCK” appears
in the display.
3 Press . or > repeatedly to select
“SET CLOCK”.
4 Press ENTER on the remote.
5 Press . or > repeatedly to set the
hour.
6 Press ENTER on the remote.
The minute indication flashes.
7 Press . or > repeatedly to set the
minute.
8 Press ENTER on the remote.
Tip
If you made a mistake or want to change the time,
start over from step 2.
Note
The clock settings are canceled when you disconnect
the power cord or if a power failure occurs.
Saving the power in
standby mode
Press DISPLAY repeatedly when the
system is off. Each time you press the
button, the system switches cyclically as
follows:
Demonstration t Clock display t Power
Saving Mode
Tips
• ?/1 indicator lights up even in the Power Saving
Mode.
• The timer works even in the Power Saving Mode.
Note
You cannot set the time in the Power Saving Mode.
To cancel the Power Saving Mode
Press DISPLAY once to show the
demonstration or twice to show the clock
display.