


21
GB
Getting Started – BASIC –
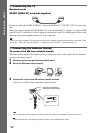
To adjust the IR transmitter and
IR receiver
After connecting the speakers, surround
amplifier, IR transmitter, IR receiver, and the
AC power cords (mains leads), adjust the
wireless system for good transmission.
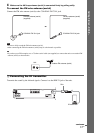
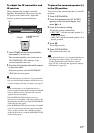
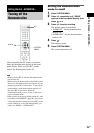
1 Press POWER on the surround amplifier,
then press "/1 on the unit.
The surround amplifier and system turn on.
The POWER/ON LINE indicator of the
surround amplifier turns red.
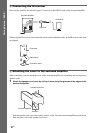
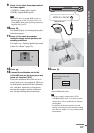
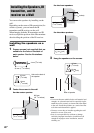
2 Orient the IR transmitter and the IR receiver
to face each other.
Adjust the position until the POWER/ON
LINE indicator turns green.
Ti
p
• The IR transmitter is movable for easy reorientation.
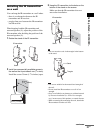
• You can install the IR transmitter and IR receiver on
a wall for better positioning. For details, see page 27.
Note
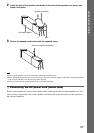
• Make sure that there is no obstruction such as a
person or object between the IR transmitter and the IR
receiver. Otherwise, the sound from the surround
speakers may be interrupted.
• If the POWER/ON LINE indicator turns red,
transmission is incomplete. Adjust the position of the
IR transmitter and IR receiver until the POWER/ON
LINE indicator turns green.
• If the POWER/ON LINE indicator flashes red, the IR
receiver is receiving an infrared signal from another
Sony’s wireless product. Move the IR transmitter
and/or the IR receiver so that the POWER/ON LINE
indicator turns green.
To place the surround speaker (L)
in the (R) position
You can swap the surround speaker (L) and (R)
positions.
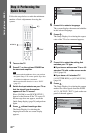
1 Press SYSTEM MENU.
2 Press X/x repeatedly until “SL SR REV”
appears in the front panel display, then
press or c.
3 Press X/x to select a setting.
The default setting is underlined.
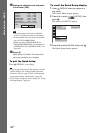
•“REV OFF”
: sets the surround speaker (L)
in the (L) position.
• “REV ON”: sets the surround speaker (L) in
the (R) position.
4 Press .
The setting is made.
5 Press SYSTEM MENU.
The system menu turns off.
Note
• If you perform the above, it is recommended that you
also change the speaker settings. For details, see
“Getting Optimal Surround Sound for a Room”
(page 78) and “Calibrating the Appropriate Settings
Automatically” (page 80).
"/1
POWER
POWER ON-LINE
POWER
POWER/ON LINE
Indicator