


17
GB
Tape
Recording a CD by specifying
track order
— Program Edit
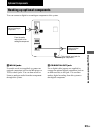
1 Load a CD and load a recordable tape.
2 Program CD tracks following step 1 to 5
in “Programing CD tracks” on page 10.
3 Press CD SYNC.
The tape deck stands by to record. The CD
player stands by for playback.
4 Press TUNER MEMORY/DIRECTION
repeatedly to select g to record on
one side. Select h (or j) to record
on both sides.
5 Press REC PAUSE/START.
Recording starts.
Tip
To check the required tape length for recording a CD,
press EDIT until “EDIT” flashes after you have
loaded a CD and pressed FUNCTION repeatedly
until “CD” appeared. The required tape length for the
currently selected CD appears, followed by the total
playing time for side A and side B respectively
(Tape Select Edit).
Note
You cannot use Tape Select Edit for discs containing
over 20 tracks.
Timer-recording radio
programs
To timer-record, set the clock (see “Setting the
clock” on page 8).
1 Press CLOCK/TIMER SET on the
remote.
“SET” appears for a second and then
“DAILY” appears.
2 Press . or > on the remote to
select “REC”, then press ENTER.
“ON TIME” appears and the hour indication
flashes.
3 Set the time to start recording.
Press . or > on the remote to set the
hour, then press ENTER.
The minute indication flashes.
Press . or > on the remote to set the
minute, then press ENTER.
4 Set the time to stop recording following
the procedure in step 3.
5 Insert a recordable tape.
Recording starts from the top side. Insert a
tape with the side you want to record on
facing up.
6 Tune in the radio station (see
“Listening to the radio” on page 13).
7 Press ?/1 to turn off the system.
Continued