Audio setup
42
SETTING UP THE SPEAKER OPTIONS
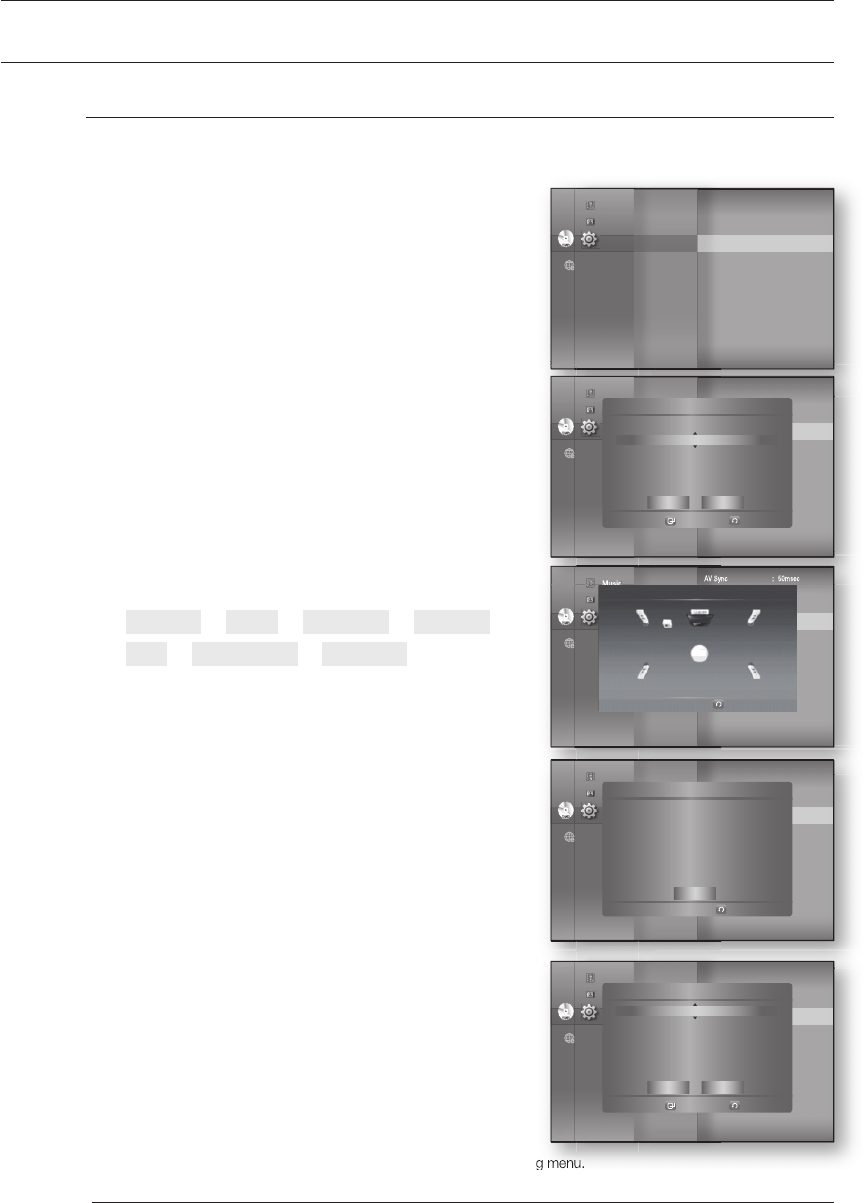
Setting the Auto Sound Calibration
To set the Auto Sound Calibration
Plug the ASC microphone into the ASC input jack.
Place the ASC microphone at the listening position.
With the unit in Stop mode, press the MENU button.
Press the
▲▼◄►
buttons to select Setup, then press
the ENTER or
►
button.
Press the
▲▼
buttons to select Audio, then press the
ENTER or
►
button.
Audio setup menu will be displayed.
Press the
▲▼
buttons to select Auto Sound Calibration,
then press the ENTER or
►
button.
Auto Sound Calibration menu will be displayed.
Press the
▲▼
buttons to select Auto Sound Calibration
Setup, then press the ENTER or
►
button.
Auto Sound Calibration will be automatically set up in
the following sequence:
Front Left ➞ Center ➞ Front Right ➞ Surround
Right ➞ Surround Left ➞ Subwoofer
When the message "REMOVE MIC" appears in the
display, unplug the ASC microphone.
To cancel the Auto Sound Calibration Setup
Press the ENTER button.
To listen in the ASC (Auto Sound
Calibration) mode
Follow steps 1-6 above.
Press the
▲▼
buttons to select Auto Sound Calibration,
then press the ENTER or
►
button.
Press the
◄►
buttons to select On or Off, then press the
ENTER or
►
button.
If you select On, you will hear sound in the ASC mode.
If you select Off, you will hear sound in the mode set in the audio setting menu.
Setting the ASC function takes about 3 minutes.
1.
2.
3.
4.
5.
•
6.
•
7.
•
8.
7.
8.
M
DVD
System
Language
Audio
◄
Display
HDMI
Network
Parental
Music
Photo
Setup
AV Sync : 50msec
Speaker Distance
Sound Edit
Auto Sound Calibration
►
Test Tone
DVD
System
Language
Audio
◄
Display
HDMI
Network
Parental
Music
Photo
Setup
AV Sync : 50msec
Speaker Distance
Sound Edit
Auto Sound Calibration
►
Test Tone
System Setup
Language Setup
Audio Setup
◄
Display
Setup
HDMI
Setup
Network
Setup
Parental Setup
Auto Sound Calibration
Return
USER
Front Left
DVD
System
Language
Audio
◄
Display
HDMI
Network
Parental
Music
Photo
Setup
AV Sync : 50msec
Speaker Distance
Sound Edit
Auto Sound Calibration
►
Test Tone
Display Setup
HDMI Setup
Network Setup
◄
Parental Setup
◄
Auto Sound Calibration
Return
OK
Front Left
Front Right
Subwoofer
Center
Surround Left
Surround Right
Speaker Distance Level
10ft (3.0m)
10ft (3.0m)
10ft (3.0m)
10ft (3.0m)
10ft (3.0m)
10ft (3.0m)
+9 dB
+8 dB
+3 dB
+3 dB
+9 dB
+8 dB
DVD
System
Language
Audio
◄
Display
HDMI
Network
Parental
Music
Photo
Setup
AV Sync : 50msec
Speaker Distance
Sound Edit
Auto Sound Calibration
►
Test Tone
Display Setup
HDMI Setup
Network Setup
◄
Parental Setup
◄
Auto Sound Calibration
Select
Return
Save Cancel
Auto Sound Calibration
:
◄
Off
►
Auto Sound Calibration Setup
DVD
System
Language
Audio
◄
Display
HDMI
Network
Parental
Music
Photo
Setup
AV Sync : 50msec
Speaker Distance
Sound Edit
Auto Sound Calibration
►
Test Tone
Display Setup
HDMI Setup
Network Setup
◄
Parental Setup
◄
Auto Sound Calibration
Select
Return
Auto Sound Calibration
:
◄
Off
►
Auto Sound Calibration Setup
Save Cancel
HT-BD3252A_XAA_0724-2.indd 42HT-BD3252A_XAA_0724-2.indd 42 2009-07-24 5:44:282009-07-24 5:44:28


