24
Using Equalization
until the ringing or feedback disappears. Don’t lower the frequency area any
further than you need to, or the quality of the overall sound may suffer. If you
don’t specifically need to utilize the ten-band graphic master equalizer in a partic-
ular environment, leave it completely flat (all sliders at their center detented “0”
position).
In most instances, the best way to approach equalization is to think in terms of
which frequency areas you need to attenuate, as opposed to which ones you
need to boost (boosting a frequency area also has the effect of boosting the
overall signal; too much EQ boost can actually cause overload—with the
accompanying Peak LED warning!). Be aware of the phenomenon of masking,
where loud sounds in one frequency range obscure softer sounds in the same
range; by cutting EQ “notches” in a loud signal, you can actually make room for a
softer one to shine through. And try not to think of EQ as a miracle worker—no
amount of equalization can put a singer in tune or remove the distortion from an
overloaded input signal! The key is to get the signal right in the first place, by
using correct gain structure and mic placement.
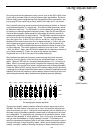
Although the specific EQ you will apply to a channel signal is very much a matter
of personal taste, here are a few general suggestions: Boosting the low
frequency of instruments such as bass drums or bass guitar will add warmth and
make the sound “fatter”; conversely, you may want to attenuate the low
frequency component of instruments such as cymbals, high-hats, and shakers
so as to “thin” them out. The mid-range controls are particularly effective for
vocals—attenuating the low-mid control can give a vocal performance more of
an “FM-radio” feel and boosting the high-mid control can help a vocal cut through
dense instrumentation. Be careful not to boost high frequencies too much or you
risk adding hiss to the signal, though just a touch can help add “shimmer” to an
acoustic guitar, ride cymbal, or high-hat.


