


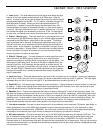
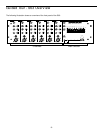
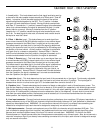

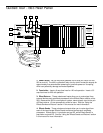

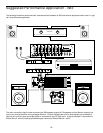

4: Ten-Band Graphic Master EQ - These sliders allow you to add ±15 db of
boost or attenuation to ten different frequency areas, affecting the main output
signal of the S63. When a slider is at its center detented (“0 db”) position, the
selected frequency area is unaffected (it is said to be flat). When a slider is
moved up (above the “0 db” position, towards the “+15 db” position), the selected
frequency area is boosted, and when it is moved down (below the “0 db” posi-
tion, towards the “-15 db” position), the selected frequency area is being attenu-
ated. For more information, see the “Using Equalization” section in this manual.
5: Main Level (white) - This knob determines the final signal level sent to the
speaker output jacks on the rear panel. At the fully counterclockwise (“∞”)
position, the signal is infinitely attenuated—that is, there is no sound. At the “0”
position, the mixer is at unity gain and is providing no attenuation or boost to the
output signal. At the fully clockwise (“+10”) position, approximately 10 db of gain
is being added by the mixer to the output signal. For more information, see the
“Setting Up and Using the S83/S63” section in this manual.
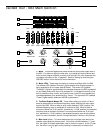
6: Phantom switch - When this switch is pressed in, the S63 delivers 48 volts
of phantom power to pins 2 and 3 of all XLR microphone connectors in all six
channels. WARNING: Only use this switch with the S63 powered down. Before
turning phantom power on, be sure to disconnect all non-microphone signal
sources (such as direct injection boxes) from the XLR mic jacks. Although
phantom power will have no adverse affect on connected dynamic microphones,
it should be used only when one or more condenser microphones are connected
to the S63. Refer to the owners manual of your microphone to determine
whether or not it requires 48 volts phantom power—we cannot assume
responsibility if you damage a mic by incorrectly applying S63 phantom
power. If you’re not completely certain that one or more connected mics require
48 volts phantom power, leave this switch off (its out position).
7: Phantom LED - This lights steadily when Phantom power is being supplied
to all mic inputs (see #6 above).
8: Peak LED - This warning light indicates an overload situation in the S63
amplifier. To stop it from lighting (and to eliminate the accompanying sonic dis-
tortion), turn down one or more channel’s Input Trim knob or reduce the amount
of equalization boost in the offending channel(s). See the “Setting Up and Using
the S83/S63” and “Using Equalization” sections in this manual for more informa-
tion.
9: Protection LED - This lights for approximately five seconds whenever the
S63 is powered on and fades slowly when the unit is powered off. It indicates
the activity of the built-in protection relay circuitry during which time 0 volts DC
are provided to all connected speakers, thus preventing any “thump.”
10: Power LED - This lights steadily whenever the S63 is powered on.
11: CD/Tape In - Use these dual RCA input jacks to connect the output from a
CD or tape player to the S63. When connected, the signal is mixed to mono and
appears at Channel 6, at unity gain (the Trim control has no effect). From there,
it can be equalized if necessary and routed to either of the two Effects sends (for
routing to connected external processors, to the internal reverb unit, and/or to
the Monitor output).
13
Guided Tour - S63 Main Section