


18
HOW – Final Assembly of Speakers
HOW – FINAL ASSEMBLY OF SPEAKERS
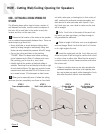
Up to this point in the installation process you have
located and cut the hole, mounted the speaker frame,
run the wires, and connected them to the speaker baffle
and to the amplifier/receiver. Now you will mount the
speaker into the frame and attach the grille.
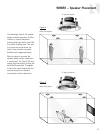
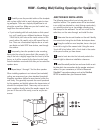
We recommend protecting the back of any ceiling speaker
from insulation and debris by draping a piece of standard
fiberglass window screening over the back of the assem-
bly. Screening is available at most home centers or hard-
ware stores. Cut a piece larger than the speaker assem-
bly and drape it over the bezel, up inside the ceiling,
before you install the baffle assembly.
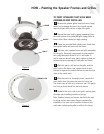
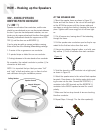
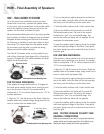
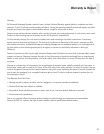
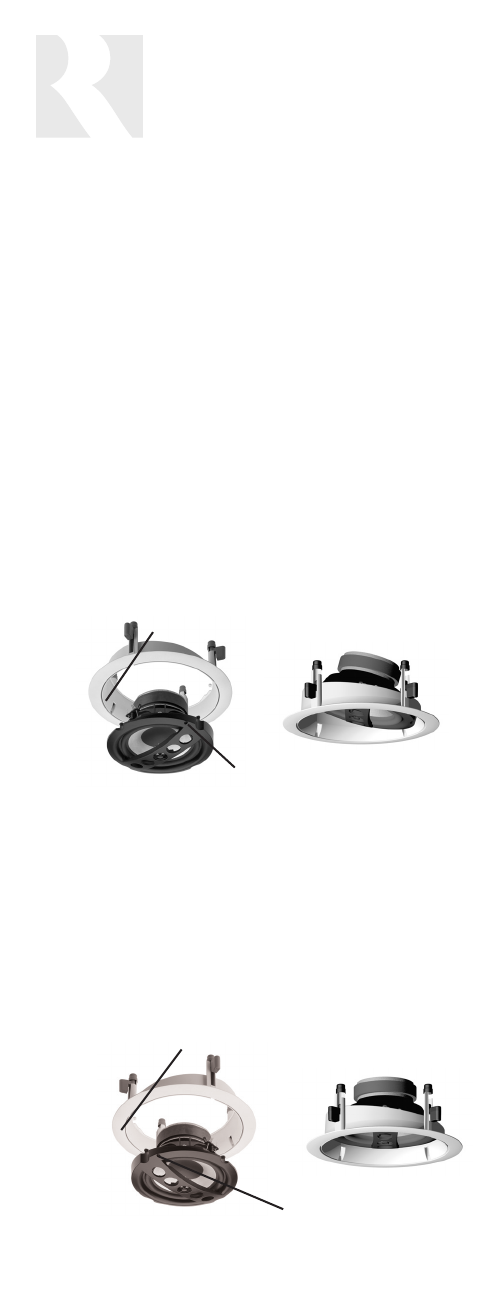
The Twist & Tilt speaker series can be installed to pro-
vide uniform dispersion (zero degree tilt) or focused dis-
persion (15 degree tilt). The baffle installation will differ
slightly for each application.
FOR FOCUSED DISPERSION:
If the speaker is being installed with the 15 degree tilt,
the small arrow molded into the frame should be point-
ing in the direction of the tilt. The speaker baffle is
marked with a “0” for uniform dispersion and a “15” for
focused dispersion.
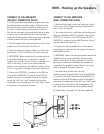
1. Align the “15” with the arrow on the frame. Grasp the
speaker baffle at the tweeter bridge, being careful not to
come in contact with the tweeter itself.
2. Line up the tabs by sighting through the molded cut-
outs in the baffle. Insert the tabs into the tab openings
and firmly push the baffle up into the frame slots.
3. Twist the baffle clockwise until it locks into the slots.
4. Secure the baffle to the frame with the small #1
Phillips earthquake screw. The hole for the screw is
located at the “lock” icon on the baffle edge. This
ensures the baffle and frame will not separate. Do not
overtighten the earthquake screw.
5. Insert the speaker grille by placing it over the speaker
baffle and aligning its edges in the frame. Press gently
into place, taking care not to scratch the frame finish or
bend the grille.
FOR UNIFORM DISPERSION:
If the speaker is being installed with no tilt, the arrow of
the frame can be pointing in any direction. The speaker
baffle is marked with a “0” for uniform dispersion and a
“15” for focused dispersion.
1. Align the “0” with the arrow on the frame. Grasp the
speaker baffle at the tweeter bridge, being careful not to
come in contact with the tweeter itself.
2. Line up the tabs by sighting through the molded cut-
outs in the baffle. Insert the tabs into the tab openings
and firmly push the baffle up into the frame slots.
3. Twist the baffle clockwise until it locks into the slots.
4. Secure the baffle to the frame with the small #1
Phillips earthquake screw. The hole for the screw is
located at the “lock” icon on the baffle edge. This
ensures the baffle and frame will not separate.
5. Insert the speaker grille by placing it over the speaker
baffle and aligning its edges in the frame. Press gently
into place, taking care not to scratch the frame finish or
bend the grille.
HOW - TESTING SPEAKER POLARITY AND
CHANNEL CONNECTIONS
Before you put away all of your tools, it’s a good idea to test the
speaker polarity and channel connections. It is helpful if you’ve
labeled your wires to identify the left and right speakers.
(15° angle) Focused dispersion
=
(0° angle) Uniform dispersion
=
Alignment Arrow
Earthquake Screw Mounting Hole
Alignment Arrow
Earthquake Screw Mounting Hole