


Installation
Runco SC-30d/SC-35d Installation/Operation Manual 49
PRE
L
IMINAR
Y
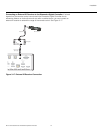
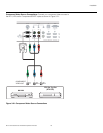
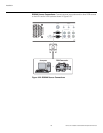
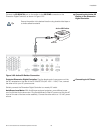
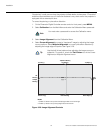
Connecting the Active 3D
Emitter to the Dimension
Digital Controller
Connect the 3D SYNC IN port on the emitter to the 3D SYNC connector on the
Dimension Digital Controller, as shown in Figure 3-25.
Figure 3-25. Active 3D Emitter Connection
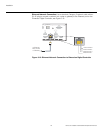
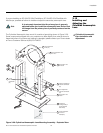
Connecting to AC PowerProjector/Dimension Digital Controller: Plug the female end of one power cord into
the AC receptacle on the rear of the SC-30d/SC-35d (AC 100V ~ 240V). Then, connect
the other end to your AC power source.
Similarly connect the Dimension Digital Controller to a nearby AC outlet.
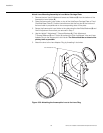
AutoScope Lens Motor: With AutoScope-equipped projectors, an additional power
cord is provided for the lens motor. Plug the female end of the AC power cord into the AC
input on the rear of the lens motor assembly. Connect the other end to a 110 VAC power
source.
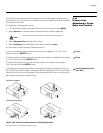
Secure the emitter in the desired location using double-sided tape or
a similar adhesive material.
Tip
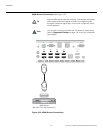
USB
Video 1
Y
Video 2
Video 3
Pr
Pb
HDMI 2
Component / SCART
TRIGGERS
123
HD1
3D SYNC
HD2
Dis
p
la
y
Port
U
S
B
Vi
deo
1
Y
Vi
d
eo
2
Vi
deo
3
Pr
P
b
HDMI
2
Com
p
onent / SCAR
T
T
RI
GG
ER
S
12
3
HD1
HD2
D
isplayPor
t
r
r
Active 3D Emitter
3D
SYNC IN