5
About Rotel
A family whose passionate interest in music
led them to manufacture high fidelity compo-
nents of uncompromising quality founded Rotel
over 40 years ago. Through the years that
passion has remained undiminished and the
family goal of providing exceptional value for
audiophiles and music lovers regardless of their
budget, is shared by all Rotel employees.
The engineers work as a close team, listen-
ing to, and fine tuning each new product until
it reaches their exacting musical standards.
They are free to choose components from
around the world in order to make that product
the best they can. You are likely to find ca-
pacitors from the United Kingdom and Ger-
many, semi conductors from Japan or the
United States, while toroidal power transform-
ers are manufactured in Rotel’s own factory.
Rotel’s reputation for excellence has been
earned through hundreds of good reviews and
awards from the most respected reviewers in
the industry, who listen to music every day.
Their comments keep the company true to its
goal – the pursuit of equipment that is musi-
cal, reliable and affordable.
All of us at Rotel, thank you for buying this
product and hope it will bring you many hours
of enjoyment.
Getting Started
Thank you for purchasing the RT-02 AM/FM
Stereo Tuner. Rotel’s Balanced Design Concept
combines advanced circuit board layout,
comprehensive parts evaluation, and exten-
sive listening tests for superior sound and long
term reliability. The Rotel RT-02 will provide
years of listening enjoyment.
Key Features
• AM and FM tuning capabilities
• User-friendly Fluorescent Display
• 30 Station Presets for memorizing your fa-
vorite stations
• Manual frequency and preset tuning, auto-
search tuning, preset scanning, and fre-
quency direct tuning.
• RDS (Radio Data System) capability for Eu-
rope and RBDS (Radio Broadcast Data
Service) capability for the USA.
• Stereo/mono switching
• 12 volt trigger connections for remote turn
on/off by Rotel preamplifiers and surround
processors.
• Full-function wireless remote control
Unpacking
Remove the unit from its packing. Look for the
handheld remote control and other accesso-
ries. Install the supplied batteries in the remote
control. Save the packing and box as it will
protect the RT-02 if you move or need to re-
turn it for maintenance.
Placement
Place the RT-02 on a solid, dry, level surface
away from direct sunlight, excessive heat, high
humidity, or strong vibrations.
The RT-02 can generate some heat during
normal operation. If installed in a cabinet, make
sure that there is adequate ventilation. Make
sure there is enough room behind the RT-02
for easy hookup. Place the unit close to the
other components in your audio/video sys-
tem and, if possible, place it on its own shelf.
This will make initial cable routing, hookup,
and any subsequent system changes easier.
It also minimizes potential interference or heat
buildup from other components.
Don’t stack heavy objects on top of the RT-02.
Do not expose the unit to moisture; this could
damage the circuitry and cause a safety haz-
ard.
English
Contents
Boxed numbers refer to RT-02 illustration.
Boxed letters refer to RR-T92 illustration.
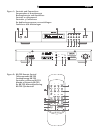
Figure 1: Controls and Connections 3
Figure 2: RR-T92 Remote Control 3
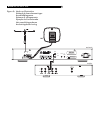
Figure 3: Hook-up Illustration 4
About Rotel............................................ 5
Getting Started ...................................... 5
Key Features 5
Unpacking 5
Placement 5
Rear Panel Connections ........................... 6
RCA Outputs 6
AM Loop Antenna 6
FM Antenna 6
AC Input 6
12V TRIGGER Connection 6
EXT REMOTE IN Jack 6
Basic Operating Controls ......................... 6
Power Button and Power LED 6
Remote Sensor 6
Front Panel Display 7
DIMMER Button 7
MEMORY Button 7
Setting Country Mode 7
Basic Tuning Controls .............................. 7
BAND Button 7
TUNING Controls 7
NUMERIC Buttons:
Station Presets 8
FREQUENCY DIRECT Button:
Direct Access Tuning 8
Auto Tuning Button 8
TUNE/PRESET Button 8
PRESET SCAN Button 8
FM MONO Button 8
RDS and RBDS Broadcast Reception ......... 9
DISPLAY Button 9
PTY Button 9
TP Button 9
TA Button 10
AF Button 10
Specifications ....................................... 10


