OPERATING YOUR TEMPEST
1) Delays- Note that the Tempest is equipped with a slow turn-on
feature that protects other equipment from dangerous transients at
turn-on as well as significantly prolonging tube life.
2) Powering up the system - First turn on the amplifier by pushing in
the “power” button. The red LED will light showing that the unit
is powered up. After approximately 10 seconds the outputs will
disconnect from ground. After another 10 seconds, the control
section will be unmuted and the Tempest is ready to play music.
Note : This unit will not play for approximately 20 seconds
after power on while tubes warm up.
3) Switches and Controls - The Tempest is equipped with volume,
balance, source, power, mute, and an optional remote volume .
• Volume – adjust gain from 0 to 23Volts out
• Balance - left and right channel attenuation
• Source - selects source material (CD, phono, tape, tuner, aux, preamp)
• Power - on/off operation
• Mute - mutes output
Remote Volume Control - The Tempest is optionally equipped with an
analog remote volume control feature. The volume may be
adjusted manually using the knob on the front panel, or by using
the remote control provided.
4) Breaking in the amplifier - As with many high-quality audio
amplifiers, the sound of the Rogue Tempest amplifier will
improve during the first 50 to 100 hours of use. This time is
required for components to “burn in.” No special techniques are
required other than standard operation.
Note: This unit will not sound its best until the tubes have
warmed up. This will take approximately 5-10 minutes
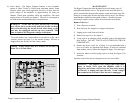
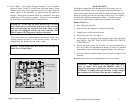
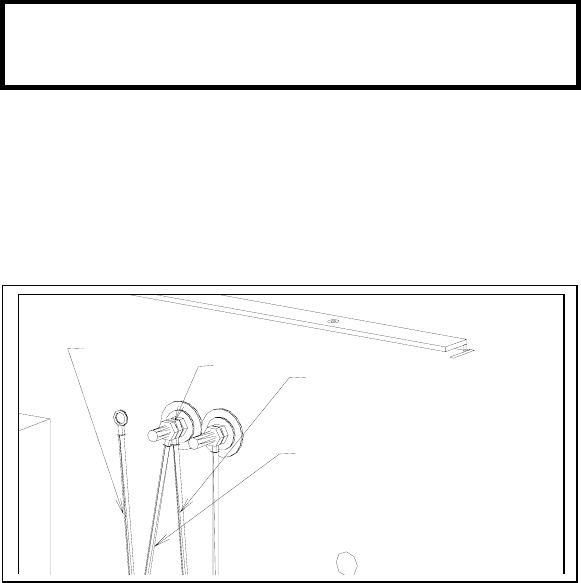
7) Matching Speaker Impedance - The Rogue Tempest provides
options for either 4 ohm or 8 ohm speakers. The impedance
selected will depend on the speakers used. Consult either the
owner’s manual for your speaker or your local dealer to
determine the correct choice. To switch impedance setting, refer
to Figure 3. Note - the amplifier is factory set for 8-ohm
speakers.
⇒ Using a 5/16” wrench, remove the outermost nut from the
red binding post.
⇒ Remove the wire and lug marked 8 ohm from the binding
post. Leave the wire and lug marked feedback in place.
Warning -Never remove the lugs marked feedback or
ground from the binding posts. Doing so could cause
permanent damage to the unit
⇒ Remove the polyurethane tubing from the unused 4-ohm
wire and lug.
⇒ Place 4-ohm wire and lug onto red binding post.
Rogue Tempest Owners Manual 5
Rogue Tempest Owners Manual 8
4 Ohm
Wire
8 Ohm
Wire
Feedback
Wire
Binding
Post
Figure 3


