


SR-H1000 CI Guide Page 3 2/28/2008
Revision 1.0
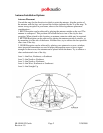
4. Turn the Tuner on and listen for audio. If no audio is heard, aim the antenna in
different directions until audio output is heard. This is the desired antenna aiming
position.
5. After determining the optimum antenna aiming position, turn the Tuner off,
disconnect the power adapter from the wall outlet receptacle, and disconnect the
antenna cable.
6. Plan the routing of the antenna cable to the Tuner. Be sure you avoid any
obstructions that could crimp, kink, or twist the cable. Use protective grommets
wherever rough openings are encountered.
Note: Do not cut the antenna cable. Do not cut the antenna cable and
attempt to splice it or attach alternative connectors or cable. The cable and
connectors used in your SR-H1000
are specifically chosen and attached at
the factory to ensure that they will work with Sirius’s unique frequency
band. Your High-Gain Home Antenna comes with 20-feet of cable. If that
is not sufficient to locate the antenna where there is a strong signal, please
see the section below on extension Cables.
7. If the antenna is mounted outside, route the cable from the antenna position to the
interior of the home, working the cable through the basement, under a window sill,
etc., and make adjustments and take up slack whenever necessary.
8. Plug the antenna cable into the ANTENNA connector on the back of the Receiver.
9. Plug the tuner into a 110VAC wall receptacle. The front panel STANDBY LED
will light red.
10. You are now ready to activate and enjoy SIRIUS programming within your home.
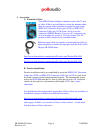
Testing Antenna Signal Strength
The stronger the signal strength, the less likely it is that you will experience
an interruption of the audio. In the menu options of the Tuner, there is an antenna
aiming display which shows two bar graphs indicating signal strength. This can be a
useful tool for positioning the antenna in an optimal location for maximum signal
reception.