


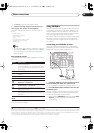

Other connections
08
50
En
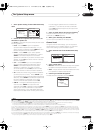
HDMI has the capability to support standard, enhanced,
or high-definition video plus standard to multi-channel
surround-sound audio. HDMI features include uncom-
pressed digital video, a bandwidth of up to 2.2 gigabytes
per second (with HDTV signals), one connector (instead
of several cables and connectors), and communication
between the AV source and AV devices such as DTVs.
HDMI, the logo and High-Definition Multi-
media Interface are trademarks or registered trademarks of
HDMI licensing LLC.
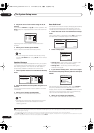
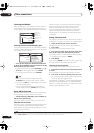
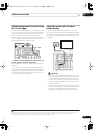
Connecting the multichannel analog inputs
For DVD Audio and SACD playback, your DVD player may
have 5.1, 6.1 or 7.1 channel analog outputs (depending
on whether your player supports surround back
channels).
1
Make sure that the player is set to output
multichannel analog audio.
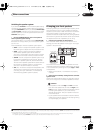
1 Connect the front, surround, center and subwoofer
outputs on your DVD player to the corresponding
MULTI CH input jack on this receiver.
• Use standard RCA/phono jack cables for the
connections.
2 If your DVD player also has outputs for surround
back channels, connect these to the corresponding
MULTI CH input jacks on this receiver.
• Use standard RCA/phono jack cables for the
connections.
• If there is a single surround back output, connect it to
the
SURROUND BACK L (Single)
jack on this
receiver.
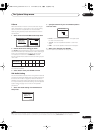
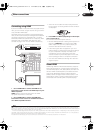
Selecting the multichannel analog inputs
If you have connected a decoder or a DVD player as
above, you must select the analog multichannel inputs
for surround sound playback.
2
1 Make sure you have set the playback source to the
proper output setting.
For example, you might need to set your DVD player to
output multichannel analog audio.
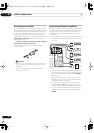
2 Press
MULTI CH IN
(front panel).
• Depending on the DVD player you’re using, the
analog output level of the subwoofer channel may be
too low. In this case switch the receiver into standby,
then press
STANDBY/ON
while holding down
SBch PROCESSING
on the front panel. This switches
between
SW IN +10dB
(increase of 10 decibels) and
SW IN 0dB
(default) in the subwoofer channel.
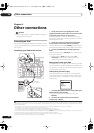
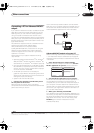
Second Zone speaker B setup
Caution
•
Before making or changing the connections
, switch off
the power and disconnect the power cord from the
power outlet. Plugging in components should be the
last connection you make with your system.
• Be careful not to allow any contact between speaker
wires from different terminals.
• You can use speakers with a nominal impedance
between 6
Ω
to 16
Ω
(please see
Switching the
speaker impedance
on page 63 if you plan to use
speakers with an impedance of less than 8
Ω
).
After selecting
2nd Zone
in
Surround back speaker
setting
on page 35, you can use the speakers connected
to the (surround back) B speaker terminals on the rear
panel to listen to stereo playback in another room. See
Switching the speaker system
below for the listening
options with this setup.
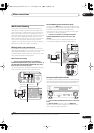
1 Connect a pair of speakers to the surround back
speaker terminals on the rear panel.
Connect them the same way you connected your
speakers in
Installing your speaker system
on page 17.
Make sure to review
Placing the speakers
on page 18
when placing the speakers in another room.
2 Select ‘2nd Zone’ from the ‘Surr Back System’ menu.
See
Surround back speaker setting
on page 35 to do this.
Note
1 To listen to multichannel analog audio you’ll need to select
MULTI CH IN
(see
Selecting the multichannel analog inputs
above for more on this).
2• When playback from the multichannel inputs is selected, you can’t use the sound processing features,
SIGNAL SELECT
, or any of the listening modes
(including
STEREO
and the surround back channel processing).
• When playback from the multichannel inputs is selected, only the volume and channel levels can be set.
• You can’t listen to your speaker B (Second Zone) system during playback from the multichannel inputs.
VSX-9110TXV_KU.book.fm 50 ページ 2006年4月4日 火曜日 午後5時15分