


The System Setup menu
07
44
En
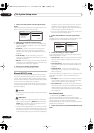
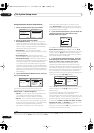
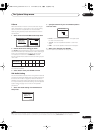
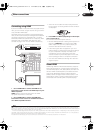
4 Adjust the level of each channel using the
/
buttons.
If you selected
Manual
, use
/
to switch speakers. The
Auto
setup will output test tones in the order shown on-
screen:
Adjust the level of each speaker as the test tone is
emitted.
1
5 When you’re finished, press RETURN.
You will return to the Manual SP Setup menu.
Tip
• You can change the channel levels at any time by
pressing
CH LEVEL
then using
/
on the remote
control.
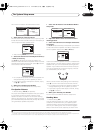
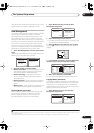
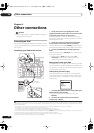
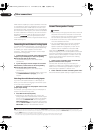
Speaker Distance
For good sound depth and separation from your system,
you need to specify the distance of your speakers from
the listening position. The receiver can then add the
proper delay needed for effective surround sound.
1 Select ‘Speaker Distance’ from the Manual SP Setup
menu.
2 Adjust the distance of each speaker using the
/
buttons.
You can adjust the distance of each speaker in 0.5 foot
increments.
3 When you’re finished, press
RETURN
.
You will return to the Manual SP Setup menu.
Tip
• For best surround sound, make sure the surround
back speakers are the same distance from the
listening position.
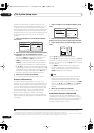
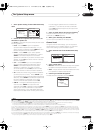
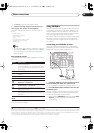
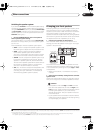
Bass Peak Level
Some audio sources (for example, Dolby Digital and DTS)
include ultra-low bass tones. Set the bass limiter as
needed to prevent the bass from distorting the sound.
1 Select ‘Bass Peak Level’ from the Manual SP Setup
menu.
The current setting is displayed. When
OFF
is displayed
the attenuator is off (bass output is not affected).
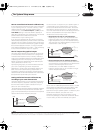
2 Select a setup option.
•
Setting Start
– The volume is set to –60 dB, a test
tone plays back and you make the setting.
•
Setting Clear
– Clears any previous setting and
switches limiting off.
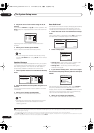
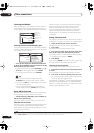
3 If you selected ‘
Setting Start’
, use
/
to adjust
the test tones and specify the bass peak level then press
ENTER
.
Set the bass peak level gradually, then press
ENTER
at
the point just before the tone starts to distort.
2
The
display on the receiver shows
RESUME
while the volume
returns to its original position, then you automatically
return to the main Bass Peak Level menu.
4 When you're finished, press
RETURN
.
You will return to the Manual SP Setup menu.
Note
1• If you are using a Sound Pressure Level (SPL) meter, take the readings from your main listening position and adjust the level of each speaker to 75 dB
SPL (C-weighting/slow reading).
• The subwoofer test tone is output at low volumes. You may need to adjust the level after testing with an actual soundtrack.
5b.Channel Level
L 0.0dB
C [ 0.0dB ]
R [ 0.0dB ]
SR [ 0.0dB ]
SBR [ 0.0dB ]
SBL [ 0.0dB ]
SL [ 0.0dB ]
SW [ 0.0dB ]
:Finish
5.Manual SP Setup
:Return
a.Speaker Setting
b.Channel Level
c.Speaker Distance
d.Bass Peak Level
e.X-Curve
f.THX Audio Setting
5c.Speaker Distance
L 10.0ft
C [ 10.0ft ]
R [ 10.0ft ]
SR [ 10.0ft ]
SBR [ 10.0ft ]
SBL [ 10.0ft ]
SL [ 10.0ft ]
SW [ 10.0ft ]
:Finish
2 If the
YES
or
PLUS
setting on the subwoofer is selected (in
Speaker Setting
on page 42), the test tone will only play back from the subwoofer. If not, the
test tone will play back from the front and surround speakers set to
LARGE
.
5.Manual SP Setup
:Return
a.Speaker Setting
b.Channel Level
c.Speaker Distance
d.Bass Peak Level
e.X-Curve
f.THX Audio Setting
5d.Bass Peak Level
:Return
Bass Peak Level :OFF
[Setting Start ]
[Setting Clear ]
5d.Bass Peak Level
:Return
Bass Peak Level :OFF
[Setting Start ]
[Setting Clear ]
Enter:Setting Start
5d.Bass Peak Level
Bass Peak Level
-60dB
Increase the Bass
Peak Level to
a comfortable volume
(-80dB = no sound)
ENTER:Finish :Cancel
VSX-9110TXV_KU.book.fm 44 ページ 2006年4月4日 火曜日 午後5時15分