


23
En
4 Getting started
English
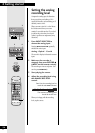
Setting the digital
recording level
One of the advantages of digital-to-digital
recording is that you don't have to set
recording levels—and risk distortion by
overloading the disc. If you're recording
commercial material from CD or MD, the
digital level has already been optimized
and you don't need to change it. If you're
making a digital copy of a CD, DAT or MD
that was not commercially produced and
that was consistently under-recorded, you
can boost the overall level by up to +20dB.
Remember though, that any peaks in the
original recording run the risk of
distorting the copy.
If you record digital satellite broadcasts,
you may also have cause to boost the
recording volume since the volume of
some broadcasts is relatively low, but
again, if there are any peaks in the
broadcast, you run the risk of momentary
distortion.
It's also possible to reduce the digital
recording volume, but in most cases, this is
not desirable. However, if you're putting
together a mix CD (various tracks
compiled from different sources), and
there is a track which stands out as
generally louder than the others, then you
might want to reduce the level of that
track. Note that this feature will not get rid
of distortion on the source material.
Once changed, the new digital recording
level remains until you change it again, or
reset it. Each digital input has its own level
which can be set independently.
NOTE: If you are recording DTS encoded
audio CDs or HDCD format CDs, the digital
recording level must be set to 0.0dB for
recording.
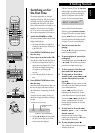
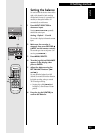
◊ÛB
-
>?/
MONITOR
INPUT
SELECTOR
AUTO
MANUAL
AUTO
MANUAL
TRACK NO.
WRITE
TIME
FINALIZEERASE
SCROLL
1
DIGITAL
REC LEVEL
ANALOG
REC LEVEL
MENU/
DELETE
TEXT
SYNCHRO
PUSH ENTER
RL
ANALOG
REC BALANCE
Legato Link Conversion
CD TEXT
4,5,6
3
4,6
ENTER
CURSOR
MENU/
DELETE
NAMEMARK
SET
CLEAR
DISPLAY
/CHARA
7
1
¡
8
3
4
¢
ABC DEF
GHI MNOJKL
PQRS TUV WXYZ
REC SYNCHRO
REPEAT RANDOMNAME CLIP
I
NPUT
SELECTER
FADER
SKIP PLAY
SKIP ID
PROGRAM CHECK CLEAR
AUTO /
MANUAL
123
4
56
78
9
10/0 >10
SCROLL
TIME
Î
•
5
3
1
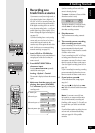
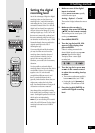
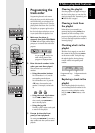
1 Make sure one of the digital
inputs is selected.
Pressing INPUT SELECTOR repeatedly
switches the active input:
Analog - Optical - Coaxial
The recorder's display indicates the current
input.
2 Make sure the recorder is
stopped, then press RECORD 
( ¶ REC on the remote control).
The recorder goes into record-pause. (You
can also press MONITOR.)
3 Press MENU/DELETE.
4 Turn the jog dial until D. VOL
appears in the display, then
press to ENTER.
If there is nothing connected to the
selected digital input, the message DIN
UNLOCK
appears in the display.
The display shows current digital
recording level.
5 Turn the jog dial or press 4
or ¢ on the remote control
to adjust the recording level up
or down.
• The maximum adjustment possible is
between MIN(silence) and +20dB.
• Pressing the jog dial (ENTER)and
holding for 3 seconds resets to OdB.
6 Press the jog dial (ENTER) to
confirm the digital recording
level.
2