


12
En
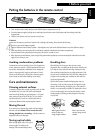
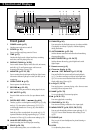
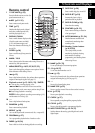
3 Controls and Displays
12 FINALIZE (p.26)
Press to start the disc finalization process (to make recordable
CDs playable on ordinary CD players). Indicator lights up
during finalization.
13 AUTO/MANUAL (p.33–34)
Switches between automatic and manual track numbering
when recording a disc.
14 INPUT SELECTOR (p.19–24,37)
Switches between the analog, optical digital and coaxial
digital inputs.
15 Remote sensor (p.9)
16 Character display (p.14)
17 1 ¡ / REC BALANCE (p.15,25,30)
Press and hold for fast-reverse and fast-forward playback
(p.15). Use when recording to set left and right input levels
(p.25).Use to move cursor back and forth across character
display while using CD text (p.30).
18 6 (p.15,19-22)
Press to play, pause, or resume playing, a disc. Also use to start
recording from record-pause mode.
19 NAME (p.30–32)
Use to cycle through CD text naming options.
20 7 (p.16,19–22)
Press to stop playback or recording.
21 SYNCHRO (p.19–21)
Press to start recording on detection of an input signal.
22 MENU/DELETE (p.16,23,25,30,33,35)
Press to cycle through the preference menu options(p.16, 23,
25,33,35). Press to delete characters while editing CD text
(p.30).
23 PHONES jack
Plug in a pair of stereo headphones for private listening or
monitoring.
24 LEVEL
Use to adjust the phones volume.
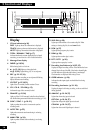
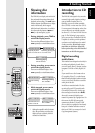
Front panel
1 POWER switch (p.15)
Switches power to the unit on and off.
2 SCROLL (p. 16)
Press to scroll through long names in CD text.
3 TIME (p.17)
Switches the display mode (elapsed track time, remaining
track time, total disc playing time, etc.)
4 DISPLAY/CHARA (p.16,30)
Press to switch between display modes (disc title, artist name,
track title) (p.16), and between upper- and lower-case
characters while using CD text (p.30).
5 MONITOR (p.23-25,36)
Press to monitor the selected input and display digital source
information.Indicator lights up to remind you when you are
monitoring.
6 OPEN/CLOSE 0 (p.15)
Press to open or close the disc tray.
7 RECORD ¶ (p.22–25)
Press to enter record-pause mode for setting input levels, etc.
8 REC MUTE • (p.35)
Records a blank section on a disc (for space between tracks,
etc.)
9 DIGITAL REC LEVEL / 4 ¢ (Jog dial)
Turn the jog dial to: set the digital recording level (p.23); skip
tracks (p.15); select options in the menu (p.23,25,33-35);
cycle through characters in CD text (p.30); select tracks to
erase (p.38-39).
Push the jog dial to: start playback (stop mode only) (p.15);
input track numbers (during programming) (p.27); select
characters in CD text (p.30); confirm menu settings (p.16).
10 ANALOG REC LEVEL (p.24)
Sets the recording level for analog-input recording.
11 ERASE (p.38–39)
Press to start erasing tracks, or to re-initialize a disc.
◊ÛB
-
>?/
COMPACT DISC DIGITAL RECORDER
MONITOR
DIGITAL
REC LEVEL
ANALOG
REC LEVEL
INPUT
SELECTOR
AUTO
MANUAL
AUTO
MANUAL
MENU/
DELETE
TRACK NO.
WRITE
TIME
FINALIZEERASE
SCROLL
TEXT
SYNCHRO
PUSH ENTER
RL
ANALOG
REC BALANCE
Legato Link Conversion
CD TEXT
12345 678910
11 12 13 14 15 16 17 18 19 20 21 2 2 2 3 2 4