


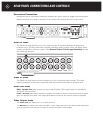
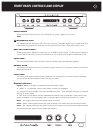


REAR PANEL CONNECTIONS AND CONTROLS continued
Zone 1 2 3 4 Switch
You can ignore this switch if you are using a single Zpre2 in your system.
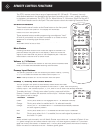
The Zone switch and remote control handset can select four discrete IR codes
to control up to four Zpre2s in four zones independently with a single remote
handset or IR-based system controller.
The Zone switch and remote handset factory default settings are both 1. If you
move the Zone switch to another number you’ll also have to reprogram the
remote handset with the same zone number (see Remote Control).
Note:
The Zone switch selects a new IR zone code only when the Zpre2 is turned off. If you
Note: The Zone switch selects a new IR zone code only when the Zpre2 is turned off. If you Note:
move the Zone switch to select a new IR zone code while the Zpre2 is turned on, you’ll need to
turn it off for a few seconds, then on again.
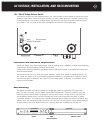
Ext (External) Remote Jack
Your Zpre2 accepts the infrared signal of any popular infrared repeater system to facilitate
remote control operation from another room or when it is installed within a closed cabinet.
This connector is a 1/8” (3.5 mm) two conductor mini jack; its center conductor (plug tip) is +,
its outer conductor (plug sleeve) is – .
Note:
Unlike Parasound Surround Controllers, the Zpre2 Ext Remote input does not require an
Note: Unlike Parasound Surround Controllers, the Zpre2 Ext Remote input does not require an Note:
amplified IR connecting block.
Automatic Turn On Options
For convenience the Zpre2 can be triggered to turn on automatically when a suitable voltage is
applied to its 12V In (input) jack. When automatic turn on is selected the Zpre2 front panel Power
button is disabled so that on/off is determined solely by the triggering system master controller.
RS-232 Control Jack
This is a DB9 serial port which accepts commands from your system controller (“write”) and feeds
back status to be displayed (“read”). The following can be controlled and displayed:
- Power on
- Input selected
- Volume was adjusted via RS-232
- Mute on
Note:
The RS-232 will feedback when volume level is changed by the RS-232, but not if it is
Note: The RS-232 will feedback when volume level is changed by the RS-232, but not if it is Note:
adjusted with the front panel knob or remote control handset. The RS-232
“read” does not display the actual level because it uses an analog volume
control which cannot show its setting. In most instances this won’t be an issue,
since volume level is immediately heard as satisfactory, too high or too low.
“Write” and “Read” RS-232 codes for the Zpre2 are available at our website,
www.parasound.com.
Auto - Man (Manual) Turn On Switch
Auto position
When the Auto - Man switch is set to its Auto position, the Zpre2 is turned on and off with an
external +9 V to + 12 V voltage from your controller or preamplifier. When the external voltage
ceases the Zpre2 will turn off immediately.
Note:
The Auto switch position disables the front panel Power button.
Note: The Auto switch position disables the front panel Power button.Note:
Man Position
When the Auto - Man switch is in its Man (manual) position, the auto turn on function is
disabled and the Zpre2 must be turned on and off manually with the Power button on its front
panel or its remote control.
Auto On
R
L
RS-232 Control
In
1 2 3 4
Auto Man
115V
/230V
60H
z
/50H
z
20W
0.5A
Fuse
Onl
y
AC Voltage Selector On Bottom
Parasound Products, Inc. San Francisco, CA USA
Ext Remote
Zone
ZPre2 Zone Preamplifier
1 - Priority
Fixed-Rec Variable-Main
Rec Out
43
2 3
4
Audio In
Audio Out
1 Video In 2
Video Out
12V Trigger
Out
Auto On
R
L
RS-232 Control
In
1 2 3 4
Auto Man
115V
/230V
60Hz
/50H
z
20W
0.5A
Fuse
Onl
y
AC Voltage Selector On Bottom
Parasound Products, Inc. San Francisco, CA USA
Ext Remote
Zone
ZPre2 Zone Preamplifier
1 - Priority
Fixed-Rec Variable-Main
Rec Out
43
2 3
4
Audio In
Audio Out
1 Video In 2
Video Out
12V Trigger
Out
5