


6
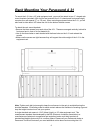
Rack Mounting Your Parasound A 31
To mount the A 31 into a 19" wide equipment rack, you must first attach its two “L” shaped rack
mount brackets (included). With its four feet removed, the A 31 chassis and front panel height
occupies four rack spaces (7" or 176 mm). When mounting equipment below the A 31, you will
also need to allow about 1⁄8" below the unit for the bottom chassis screws.
To attach the rack mount brackets:
• Remove the three screws from each side of the A 31. These are arranged vertically, behind its
front panel and in front of its first heatsink fin.
• Line up the three holes on each bracket with the three holes on the A 31 and reinsert the
screws.
• Make sure the screws are tight because they will support the entire weight of the A 31 in the
equipment rack.
Note: Tighten each bolt just enough to keep the unit secure in the rack to avoid deforming the
shoulder washers. Eliminating metal-to-metal contact reduces the likelihood of creating a ground
loop that might introduce hum into your system.
A single standard rack space is 1-3⁄4" (44mm) high in a 19" wide equipment rack. This
measurement standard was developed by the EIA (Electronic Industries Association) so
manufacturers of electronic components and equipment racks could build products in
standardized heights that would fit in a uniform space. Please call your Parasound dealer or
Parasound Technical Services if you need additional advice about rack mounting the A 31.