


5
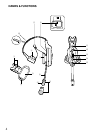
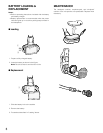
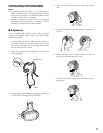
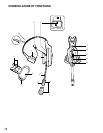
q Head Band and Head Pad
Adjustable to your head by sliding the head pad.
w Battery Lock [EJECT]
When removing the battery, slide out the lock.
When loading a new battery, insert the battery until the
lock clicks.
e Battery (Optional accessory)
Refer to p. 3 PRECAUTIONS.
r Head Pad Cushion
t Strap (Standard accessory)
y Switch Pocket
Do not open the lid. Should be opened only by qualified
service personnel or system installers.
u Earphone Pad
i Microphone Boom
Adjust the microphone position to your mouth by rotat-
ing and bending the boom.
o Microphone and Windproof Cushion (Standard
accessory)
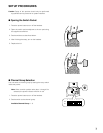
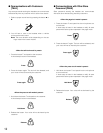
!0 Channel Indicator
Stead red and green light indicates which channel is in
operation.
Red: Is lit when channel A is selected.
Green: Is lit when channel B is selected.
Blinks to indicate the Talk or Page mode.
Constant Blink: Talk mode
Random Blink: Page mode
!1 Power Button and Indicator [POWER]
Pressing the button for one second will turn the headset
on or off.
The indicator shows the status as follows.
Green On: The headset is supplied power and in
operation.
Red On: The battery requires recharging.
Red Blink: The channel selector is set to the wrong
position.
!2 Volume Control Buttons [VOL ▲▼]
Pressing the respective buttons will increase or
decrease the sound level.
!3 Talk Button [T]
This button controls communications with the customer.
When the button is released, you can hear any cus-
tomer who is at the menu-board.
While the button is held down in the press-to-talk
mode, you can speak to the customer.
When the button is pressed in the talk-lock mode, you
can speak to the customer until you press the button a
second time.
!4 Page Button [P]
This button controls communications with store person-
nel.
When the button is released, you can hear the commu-
nications among store personnel.
While the button is held down in the press-to-talk
mode, you can speak to store personnel.
When the button is pressed in the page-lock mode,
you can speak to the store personnel until you press a
button a second time.
!5 A/B Channel Selection Button [A/B]
This button switches the frequencies used from channel
A to B and vice versa. The channel indicator will display
the currently selected channel in red (A) or green (B).
!6 Head protectors (Standard accessory)