


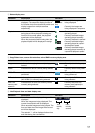

10
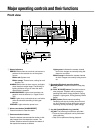
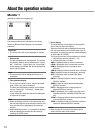
Shuttle ring: The following functions are provided.
• Fastforward/reverseplaybackcanbeper-
formed during playback.
y Hold button [HOLD]
Press this button during fast forward/reverse play-
back started by the shuttle ring to hold the current
playback speed (hold playback speed function).
(During hold playback: Blinks green)
This button can also be used for the panning/tilt-
ing operation of the camera. (During low-speed
panning/tilting control: Lights green)
u Maintenance port [MAINTENANCE]
The maintenance port that can be used for con-
nection with a PC is provided inside the cover. Do
not use for any operation other than maintenance.
i HDD indicators (HDD1 - HDD4)
STS (status): Indicates the operational statuses of
the respective hard disk drive.
Lights green: Indicates that the power of the
respective hard disk drive (formatted) is on.
Blinks green: Indicates that the respective
hard disk drive is for playback use only.
(Recording is unavailable using the respec-
tive hard disk drive.)
Blinks orange: Indicates that the respective
hard disk drive is currently being formatted.
Lights red: Indicates that formatting of the
respective hard disk drive has failed.
Off: Indicates that the power of the respective
hard disk drive is off, or that the hard disk
drive is not connected/recognized.
A/F (HDD access/failure): Indicates the status
(access/failure) of the respective hard disk
drive.
Blinks green: Indicates that the respective
hard disk drive is being accessed.
Lights red: The respective built-in hard disk
drive is faulty (Data recovery is possible by
replacement.)
Blinks red: The respective built-in hard disk
drive is faulty (Data recovery is possible by
replacement.)
Lights red and orange alternately: Indicates
that the respective hard disk drive is cur-
rently being recovered in the RAID 5/RAID
6 mode. (It may appear that the indicator
lights orange when recovery is being pro-
cessed at high speed.)
Off: Indicates that the respective hard disk
drive is not being accessed.
Important:
• WhenoperatingintheRAID5/RAID6modeand
the HDD indicator lights red, replace the faulty
hard disk drive promptly. Contact your dealer for
replacement of hard disk drives.
In the RAID 5 mode:
When 2 or more HDD indicators light/blink red, it
is impossible to recover data on the faulty hard
disk.
In the RAID 6 mode:
When 3 or more HDD indicators light/blink red, it
is impossible to recover data on the faulty hard
disk.
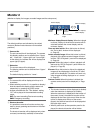
o Monitor operation buttons
[MONITOR] button: Press this button to change
the monitor to be operated. The monitor num-
ber will light to indicate the monitor currently
being selected.
[SEQ] button: Press this button to start/stop the
sequence. (During the sequence: Lights green)
[OSD] button: Press this button to display/hide
information such as the camera title.
[MULTI SCREEN] button: Press this button to
change the display pattern of multi-screen.
(The display pattern of multi-screen will
change each time this button is pressed.)
!0 Playback control function button
[GOTO LAST] button: Press this button to jump
the playback point to the top of the latest
recorded image.
[GOTO DATE] button: Press this button to desig-
nate time and date of recorded images to be
played.
[SEARCH] button: Press this button to play
recorded images after the recording event
search or the VMD search. (During search and
playback: Lights green)
[COPY] button: Press this button to display the
menu on which it is possible to copy data onto
a DVD or an SDHC/SD memory card. (☞ Page
59)
!1 [SUB MENU] button
Press this button to display the submenu used for
camera operation and the electronic zoom.
(☞ Page 16)