


Refer to the illustrations on pages 20 to 24
of the Japanese text.
Preparation
Preparation
≥
Release HOLD.
≥
Insert the rechargeable battery into the unit.
≥
Insert a recordable MD.
1
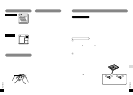
Connect this unit to a unit that has a
digital output terminal.
Connect this unit to a unit that has
stereo LINE OUT terminals.
≥
Connect while the unit is stopped.
≥
Do not connect anything to [MIC (PLUG
IN POWER)] when analog recording.
2
Slide [REC/LP MODE
➞
] to the right.
The unit comes on and enters the recording
standby mode.
To record at the correct volume
Adjust the recording sensitivity to suit the
equipment you have connected. (See page 85.)
3
Slide again [REC/LP MODE
➞
] to select
the recording mode.
The mode changes each time you slide the
button.
LP2 : LP2 stereo mode
(----------------------]
;|
LP4 : LP4 stereo mode
|
;|
No indication : Normal stereo mode
----------}
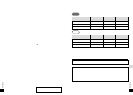
The recording times for each mode are as
follows when you use an 80-minute MD.
LP2 stereo mode : Max.160 minutes
LP4 stereo mode : Max.320 minutes
4
1
Press [
1
;
] to start recording.
2
Begin playback of the source.
1
If you have inserted an MD with recordings
already on it, recording starts from the first
available space.
∫
To pause recording
Press [
1
/
;
]. (The number of tracks
increases by one.)
Recording restarts when pressed again.
∫
To stop recording
Press [
∫
/OPR OFF].
(UTOC is recorded.)
≥
The unit powers itself off automatically in
about a minute.
≥
You can turn off the unit by pressing again
[
∫
OPR OFF] on the main unit while
stopped.
RQT6558
Basic recording
Operating Instructions
Operating Instructions
DIGITAL
ANALOG
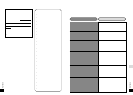
Insert an MD
Refer to the illustration on page 17 of the
Japanese text.
1
Slide [OPEN] in the direction of the
arrow to open the lid.
2
Slide the MD between the guides so it
clicks into place.
3
Now close the lid.
The unit will come on and read the information after
you insert the MD. If no operation is carried out for a
minute the unit turns itself off automatically.
The title of the disc and song is shown. The title
scrolls if it can not be displayed all at once. “BLANK
DISC” is displayed when you insert a blank MD.
Removing the disc
Slide [OPEN] in the direction of the arrow and the disc
springs out from the unit.
RQT6558
Note
I
f you have set the recording mode to “SYNC”,
recording begins immediately if the source, for
example the radio, you are recording is already
playing.
4
Begin playback of the source.
Recording begins automatically.
∫
To pause recording
If you have selected
≥
Synchronized recording (SYNC)
This unit automatically pauses if the source
is stopped or if 2 seconds of silence when
analog recording, 7 seconds of silence when
digital recording is detected. (The number of
tracks increases by one.)
≥
One track synchronized recording (SYNC 1)
The unit automatically pauses after the first
track finishes.(The number of tracks
increases by one.)
Recording restarts as follows
≥
Synchronized recording (SYNC)
When sound is input again
≥
One track synchronized recording (SYNC 1)
When you change the CD and play track 1
∫
To stop recording
Press [
∫
/OPR OFF].
(UTOC is recorded.)
≥
The unit powers itself off automatically in
about a minute.
≥
You can turn off the unit by pressing again
[
∫
OPR OFF] on the main unit while
stopped.
Note
≥
One track synchronized recording does not
function in the following cases:
1
When you start CD play from track 2 or
later.
2
When the first track on a CD is not
numbered 1 (on the second of a set of two
CDs, for example).
≥
You cannot pause recording manually during
synchronized and one track synchronized
recording.
≥
You cannot use synchronized recording
when using a microphone.
≥
The beginnings of tracks may be cut-off
when you use synchronized recording. Use
normal recording if this occurs.
∫
Making good recordings
≥
It is best to run the unit off the AC mains as
much as circumstances of use permit. The
unit should always have a rechargeable
battery on board when being run off the AC
mains.
≥
Do not press [
<
, EJECT] on the multi cradle
while recording.
≥
Do not open the lid or shake the unit while
recording. Be especially careful while “UTOC
Writing” is on the display . If the unit is
moved at this time, the recording may not be
correctly recorded onto the disc.
≥
You can damage the unit or disc if you try to
force open the lid.
∫
High quality recording
You can take advantage of the unit’s High
Density Encoding System (HDES) when using
normal stereo mode for recording, whichever
input mode you choose to use; digital, analog,
or microphone.
HDES does not function when you use MDLP
modes. “HDES” appears on the unit’s display
when you put the unit in the recording standby
mode.
Synchronized recording
Synchronized recording
This method starts and stops recording at the
same time as the source being recorded.
One track synchronized recording
The first track on a CD is recorded and then
the unit goes to recording standby mode. This
is a convenient mode if you want to record the
first track off a number of single CDs.
Preparation
Preparation
≥
Release HOLD.
≥
Insert the rechargeable battery into the unit.
≥
Insert a recordable MD.
1
Connect this unit to other equipment.
2
Slide [REC/LP MODE
➞
] to the right.
Slide again the switch to select LP2/LP4.
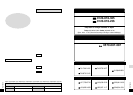
3
Press [MODE] to select the recording
mode.
Each time the button is pressed
SYNC
>
SYNC 1
>
Normal (No display)
^__________}
SYNC
>
Normal (No display)
^_____}
DIGITAL
ANALOG
Operating Instructions
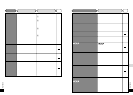
The HOLD Function
Refer to the illustration on page 16 of the
Japanese text.
This function stops the unit and remote control from
responding when a button is pressed.
Guards against the following
≥
The unit is powered on accidentally when not in use,
causing the batteries to run down.
≥
A button is accidentally pressed during play or
recording, interrupting the operation.
There is a HOLD switch on both the unit and
remote control, each of which works independent
of the other.
∫
The “HOLD” display
This is displayed for a few seconds on the main unit's
and the remote control's display panels when the
following occurs.
≥
The main unit is on hold and a button is pressed.
(When off, display appears only if [
1
;
] or
[REC LP MODE
➞
] is operated.)
≥
The remote control's switch is moved to hold.
Setting the speakers
Refer to the illustration on page 16 of the
Japanese text.
Attaching speakers to the multi cradle
There is no differentiation made between the
speakers regarding left and right. Just connect the
speaker you place on the left to the terminal on the left
and similarly for the speaker on the right.
Note
≥
Make sure that there is a rechargeable battery in the
unit before you place it on the multi cradle and
connect the AC mains. No sound will be produced
from the speakers if you are using only a battery.
≥
Do not connect speakers other than those provided.
Also, do not connect the speakers provided to other
equipment.
≥
Speakers are easily affected by magnetic fields so
avoid placing cash cards and travel cards nearby.