8
Simple Setup
Positioning
RQTX0088
Caution
≥Do not touch the front netted area of the speakers. Hold by the sides.
e.g. Center speaker
≥[PT465] Do not stand on the base. Be cautious when children are near.
e.g. Front speaker
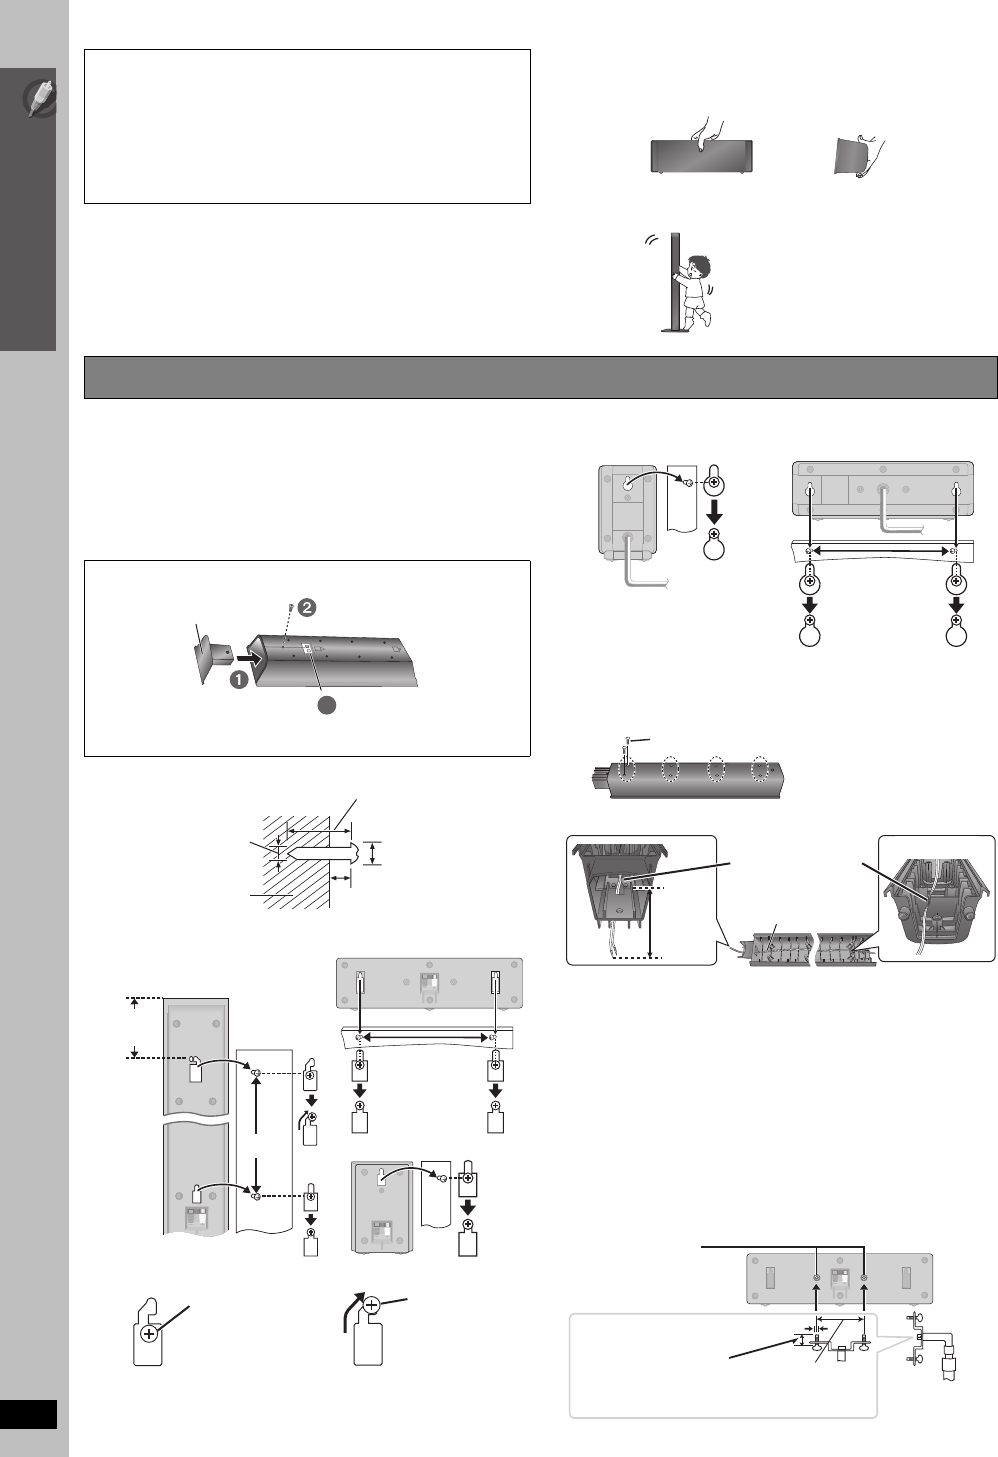
∫ Attaching to a wall
You can attach all of the speakers (except subwoofer) to a wall.
≥The wall or pillar on which the speakers are to be attached
should be capable of supporting 10 kg per screw. Consult a
qualified building contractor when attaching the speakers to a
wall. Improper attachment may result in damage to the wall and
speakers.
1 Drive a screw (not included) into the wall.
2 Fit the speaker securely onto the screw(s) with the hole(s).
[PT465] Reattaching the speaker cable to the stand
1 Remove the eight screws from the stand, and remove the speaker
net.
2 Position the cable.
3 Attach the speaker net with the screws.
∫ Fitting speaker stands (not included)
[PT465] (Except front speakers and subwoofer)
[PT460] (Except subwoofer)
Ensure the stands meet these conditions before purchasing them.
Note the diameter and length of the screws and the distance
between screws as shown in the diagram.
≥The stands must be able to support over 10 kg.
≥The stands must be stable even if the speakers are in a high
position.
e.g. Center speaker [PT465]
Caution
≥The main unit and supplied speakers are to be used only as
indicated in this setup. Failure to do so may lead to damage to
the amplifier and/or the speakers, and may result in the risk of
fire. Consult a qualified service person if damage has occurred
or if you experience a sudden change in performance.
≥Do not attempt to attach these speakers to walls using
methods other than those described in this manual.
DO
DO
NOT
DO
NOT
Speaker installation options
[PT465] Preparation for front speakers
§
Use the cable from the stand by releasing it from the grooves at
both ends.
3
Cover plate
Tighten securely.
Connect the cable
§
(➜ 6).
‰7.0 to 9.4 mm
4 to 6 mm
Wall or pillar
‰4.0 mm
At least 30 mm
Front speaker [PT465]
Attach to a wall without the
base and the stand
Center speaker [PT465]
200 mm
106 mm
Surround speaker [PT465]
340 mm
In this position,
the speaker will
likely fall if moved
to the left or right.
Move the speaker
so that the screw is
in this position.
e.g. [PT465]
DO
DO
NOT
Front and surround
speaker [PT460]
Center speaker [PT460]
190 mm
Screw
Press the cable into
the groove.
Approx.
15 cm
Cable
Speaker stand
(not included)
Plate thickness plus
7 mm to 10 mm
5 mm, pitch 0.8 mm
Metal screw holes
For attaching to
speaker stands
60 mm
PT465GC-GS-GCS-GCT-PT460GN_RQTX0088-B_eng.book Page 8 Thursday, December 13, 2007 9:04 AM


