


1818
SN 29343138 TX-L5.E
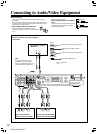
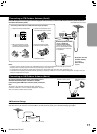
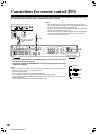
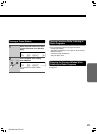
Connections for remote control (z)
Incomplete
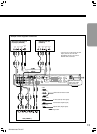
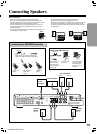
• Connect the cassette tape deck to the MD/TAPE jacks. In this case, switch the source
from MD to TAPE (refer to page 27).
• Connect the CD player to the DVD/CD jacks. In this case, switch the source from DVD
to CD (refer to page 27).
Notes
• Do not connect the Onkyo MD recorder , CD recorder and cassette tape deck with the z cable at
the same time. This may lead to unexpected operation.
• Connect the plugs securely.
• Be sure to connect to the z connectors using the z cable.
• The connections on pages 12 and 13 are needed even if z connection is made.
• Do not connect the AV Receiver’s z connector to any component other than an Onkyo product. It
may cause malfunction.
• Certain component models may not be able to control the TX-L5.
Example: Onkyo DVD Player DV-L5
Insert completely
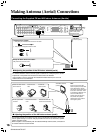
You can use the remote controller of this receiver to operate the z-connected Onkyo DVD player, CD player, MD recorder
or cassette tape deck using the z cable provided with them (refer to page 27).
z cable
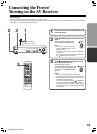
Notes
• When the DVD player, CD player or MD recorder connected to with the
TX-L5 through z cable is turned on, the TX-L5 automatically turns on and
selects the source that was turned on. (Auto Power On)
• Turning the TX-L5 off sets the z-connected DVD player, CD player or MD
recorder to standby mode. (Auto Power Off)
• When the TX-L5 is already on, pressing the play button on the DVD player,
CD player, cassette tape deck or MD recorder merely selects the input
source that was played. (Direct Change)
R
L
FRONT SPEAKERS
SURROUND
SPEAKERS
CENTER
SPEAKER
R
L
ANTENNA
AM
FM
75
REMOTE
CONTROL
S VIDEO
SUB
WOOFER
PRE OUT
MON OUT
VIDEO
IN
IN
OUT
IN
IN
OUT
IN
IN
DVD/CD
MON
OUT
DVD/CD
L
R
IN
AUDIO
VIDEO 1
VIDEO 2
MD/TAPE
OUT
IN
OUT
IN
OUT
IN
IN
HD
DVD/CD
L
R
VIDEO 1
VIDEO 2
V
IDEO 2
VIDEO 1
AV RECEIVER
TX-L5
DIGITAL INPUT
(
OPTICAL
)
(
COAXIAL
)
VIDEO 2
DVD
HD
(
OPTICAL
)
L
MONO
R
VIDEO OUTPUT
Y
C
B
C
R
OPTICAL
COAXIAL
REMOTE
CONTROL
REMOTE
CONTROL
ANALOG
OUTPUT
DIGITAL
OUTPUT
VIDEO
S VIDEO
COMPONENT
W
L
MONO
R
ANALOG
OUTPUT
DO NOT connect the
power cord (mains
lead) at this time.
Be sure to connect using
the audio connection
cable.