


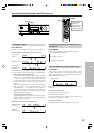


35
Using the remote controller with your other AV components
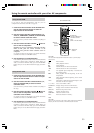
Using the RC-518M
If you need to enter the manufacturer’s code for your AV
component into the remote controller, see page 33.
1. Point the remote controller at the HT-R420 and
use the input selector buttons to select an
input source for the HT-R420.
2. Use the remote controller’s mode buttons (i.e.,
VCR, TV, CABLE/SAT, CD/DVD, or RCVR/TAPE)
to select a remote controller mode.
(You don’t have to point the remote controller at anything for
this step.)
3. Use the remote controller’s Power button to
turn on the AV component.
Remember, if your AV component is connected to the HT-
R420 via z, point the remote controller at the
HT-R420. If not, point the remote controller at the AV
component.
(A cassette recorder can’t be turned on or off from the remote
controller. You must use its POWER switch.)
4. Use the buttons as explained below.
In the following illustrations, buttons that control the HT-R420
regardless of which mode is selected are shaded. When you
want to control the HT-R420 fully, press the RCVR/TAPE
button, then you can use all the buttons that apply to the HT-
R420.
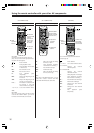
Using the RC-479S
1. Point the remote controller at the HT-R420 and
use the input selector button to select an input
source for the HT-R420.
2. Use the remote controller’s mode buttons (i.e.,
DVD, CD, RCVR/TAPE) to select a remote
controller mode.
(You don’t have to point the remote controller at anything for
this step.)
3. Use the remote controller’s Power button to
turn on the AV component. Point the remote
controller at the HT-R420.
(A cassette recorder can’t be turned on or off from the remote
controller. You must use its POWER switch.)
4. Use the buttons as explained below.
In the following illustrations, buttons that control the HT-R420
regardless of which mode is selected are shaded. When you
want to control the HT-R420 fully, press the RCVR/TAPE
button, then you can use all the buttons that apply to the HT-
R420.
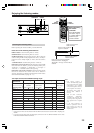
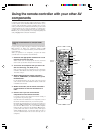
: Power On/Off.
£ : Starts playback of DVD.
7 : Stops playback.
¡ : Searches the disc in the forward direction.
1 : Searches the disc in the reverse direction.
8 : Lets playback pause temporarily or advances the
disc frame by frame.
¢ : Starts playback from the beginning of the next
chapter/track.
4 : Starts playback from the beginning of the current
chapter/track.
DISC : This button is valid when the DVD changer is used
and selects the disc to be played.
1–9, +10, 0 : Use to enter numeric values.
TOP MENU : Displays the top menu of each DVD disc.
MENU : Displays a menu recorded in the DVD disc.
RETURN : Returns to the previous menu.
SETUP : Displays the setup menu.
5/∞/2/3 : Selects an item in a menu.
ENT : Enters the selection in memory.
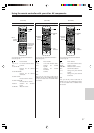
Note
RC-518M:
Since you can only enter a CD code or DVD code for the CD/DVD
button, you can use CD mode or DVD mode, but not both.
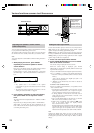
4. DVD
operation
buttons
1. DVD input
selector
2. CD/DVD
The RC-518M remote
controller is shown
here.
(DVD on the RC-479S)
DVD mode
RC-518M:
You must enter the appropriate manufacturer’s code for your DVD player
(see page 33).
3.
(RC-518M/RC-479S)