


CDN-88 Dual CD Player
- The Leader in DJ Technology
©2000 Numark Industries
- 7 -
http://www.numark.com
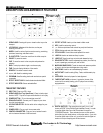
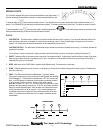
LCD DISPLAY FEATURES
6
7
8
9
10
12345
23
20
161513 14
12
11
18
17
21
19
22
24
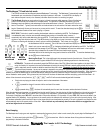
1. PLAY - Active while the unit is actually playing a CD.
2. PAUSE - Active when the unit is paused.
3. CUE - Flashing when the unit is setting a cue point. Active when
the unit is paused at a cue point.
4. HOT 1 HOT 2 – Active when hot points have been set.
5. SINGLE - Shows when the unit is set to play just one track at a
time.
6. CONTINUOUS- Shows when the CD will play continuously
through all tracks and then start over repeating the CD infinitely.
7. PROGRAM – On when a sequence of songs is preprogrammed
into the unit.
8. EFFECT – indicates when wheel is in effect mode
9. FREE WHEEL – indicates when the wheel will cue as a smooth
transition over the music creating a scratch effect. When not lit
the wheel will cue in the customary stutter style.
10. TIME MODE -
• (ELAPSED) is for showing time as it is taking place.
• (REMAIN) shows how much time is left on a particular
track.
• (TOTAL CD) indicates when full CD remain time is
showing.
11. TIME BAR - Shows either track time remaining, total CD time
remaining or track elapsed time depending on the setting of the
“TIME” button.
12. TOTAL TRACK – shows number of tracks available on the CD.
13. TRACK - Shows the track that the unit is playing with.
14. MINUTES - Shows the minutes elapsed or remaining depending
on mode setting.
15. SECONDS - Shows the seconds elapsed or remaining
depending on mode setting.
16. FRAMES - The CD Player breaks down a second into 75
frames for accurate cueing. This shows the frames elapsed or
remaining depending on mode setting.
17. BPM – Indicates the current BPM and effect information.
18. KEY – Lights when key effects are active
19. LOCK – Lights when key has been locked
20. KEY LEDS - Indicates key position.
21. PITCH – Lights when pitch is active.
22. PITCH LEDS – shows current pitch position.
23. MASTER/SLAVE – indicates side dominance in interlock
functions
24. AUTOSTART- Indicates when the CD is set to AUTOSTART.
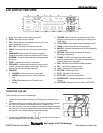
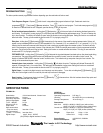
CONNECTING YOUR UNIT
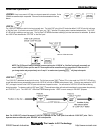
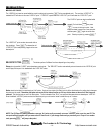
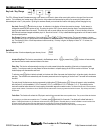
Typical connection with a mixer is illustrated right.
1. Connect the output connection cords from the CD Player to the line inputs of your
mixer.
2. Connect the remote control connection cable from the Unit A connector on the main
unit to the Unit A connector on the remote control unit. Repeat for Unit B.
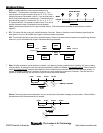
3. The output connection cords and the remote control connection cables are supplied
with the main unit. Be sure to use the remote control connection cables, which have
been supplied. Use of another cable type might cause damage.
4. For fader start connect fader start cables
to both side of your CD player to
a similarly equipped DJ mixer, as in the top drawing.