


Installation in New
Construction
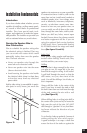
Stage One: Before Drywall is Hung
Insulating the Wall Cavity.
If feasible, fill the wall cavity with insulation
at this point
.
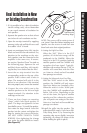
Mounting The CM8 Series
New Construction Bracket
The hole saving bracket enables a faster
and cleaner final installation of the speaker.
It forces the drywall installer to cut out the
speaker hole for you and provides wire ties
for the speaker wire, reducing the risks of
accidental loss or movement of the wire. In
addition, it enables you to align your speak-
ers with other ceiling fixtures with great
accuracy since you can really see exactly
where the speaker will be.
To install the bracket, first attach the
QuickSnap
™
new construction wings to the
bracket by snapping them into the sides of
the bracket. The wings can be shortened by
breaking them along the scored lines if their
length will interfere with a corner or eaves.
The wings and brackets have centering lines
to simplify the placement of the speaker.
Screw one side of the assembled bracket
with wings to the joist using one of the
supplied screws. Level the bracket. Screw
the other side of the bracket/wing assem-
bly to the joist. Two screws on each side
makes for a very secure installation.
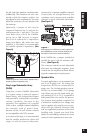
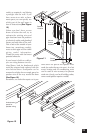
Secure the wire to the bracket using the
bracket’s wire tie
(See Figure 15). The
drywall installers will cut the drywall to
the exact size of the bracket.
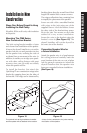
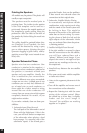
Concealing Speaker Wire for
a Future Installation
Attach the speaker wire in a loop between
the ceiling joists and carefully mark the
exact location of the wire on a set of plans
Ask the general contractor to inform the
drywall installers that the speaker wire
loops are concealed for future installation.
(See Figure 16).
14
Installation in New Construction
The optional hole saving brackets are installed
and the speaker wire is attached to the bracket.
Figure 15
A loop of wire is attached to the joists marking
the location of the speaker.
Figure 16