


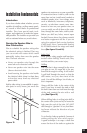

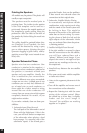

In traditional wood ceiling joist/drywall
construction you should first cut the hole
for the speaker and utilize the large hole to
auger holes across the ceiling (through the
ceiling joists) for as far as your drill bit will
take you. Sometimes, you will need to use
the “notching” technique to reach areas
your drill bit won’t reach or to turn corners
(e.g. to go down the wall when there is not
an accessible attic). Don’t make an irregu-
lar hole in the drywall. If you carefully cut a
rectangular hatch in the drywall you will
make your patch at the same time you cut
your hole. Notch the bottom of the joists
and run the wire through the notches.
Protect the wire with nail plates. Once
you’ve run your wire replace the hatch you
cut using standard drywall “joint tape” and
“joint compound” to hold the patch in
place, let dry, sand the surface and touch-
up the wall with paint
(See Figure14).
13
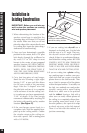
Installation Fundamentals
Figure 13
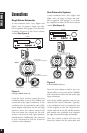
Figure 14 Diagram of ceiling speaker cut-out with ceiling joists notched for wire run.
The doorjamb has been removed and the speak-
er wire concealed between the wall and the jamb.
Nail plates are installed to protect the wire and
the door jamb is replaced.
Nail plate
Nail plate
Ceiling
Wall
Joist
Stud Plate