


fuaniture.
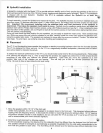
Arrange the speakers so that the distance between the listener and the center of the speaker
plane
is
'1.5
times
the distance between the speakers. This configuration
puts
the listener in the center of the stereo
image. Begin
your
listening by sitting centered behveen the speakers. While listening to the
first
seleciion,
close
your
eyes and listen
for image focus and depth of sound between the speakerc- Balance this image focus and deplh with apparent stage
-
width, listening for sound beyond lhe boundaries of the left and right speakers.
Play
all three
recordings
before
\v
completing this step.
Image Focus: The
localizability of a
pafticular
musical event in the sound field
(e.g.,
the bass is to the left, the saxophone
is to the ight, and the
piano
is
centered between
them).
Depth of sound:
The sensation that one musical event occurc behind another.
The music
shouldnl
seem confined to a
flat
plane
between
the speakers
(e.9.,
the
piano
is centercd behind the bass and saxophone).
3.
Determine fine
placement
by moving the speakers inward or outward
from each other
N,,love the VT-3s no more than l" either toward or away
from each other Initially, make sure that the speakers are
pa€llel
to each other.
Play
the same three
recordings
again,
listening for image focus, stage
width
and depth.
Evaluate
whether there is an impfovement. lf the overall
performance
is imprcved, mark the
position
with
a
piece
of
masking
tape, and continue
this
process
unlil
you
have determined the best balance of
imaging, depth and soundstage width.
A small degree of
toe-in may be necessary to obtain the best image focus. Determine
the toe-in afler
you
are satisfied
with the depth
and width of the soundstage. No more than 10 degrees should
be required
(i.e.,
the outside corner of
the speaker
is about 1" farther from the front wall than the inside corner).
4. lnstall the metal cones.
Now that
you
have the speakefs in the besfsounding
position,
install the metal cones on
to
lhe stabilizer
bars
(refer
to
SpikeKit installation above). Once all
four
cones
are installed, recheck
your
measurements,
making sure that the
speakers are still exactly
where
you
want them.
5, Adjust spoaker
tilt.
."'
To st€rt, adjust
the cones as needed to ensure the VT-3 is level and does
not rock in any direction
(use your
level to be
sure).
Experiment with the vertical axis by raising and lowerlng
your
ear level in the listening
position.
At one
particular
vertical
position, you
may notice more ambience and
depth
jn
the sound 6tage. lf the improvem€nt occufs
when
yourears
are at a lower
posilion,
raise
the height at the rearofspeakers by slowly unsctewing the two
metalcones
on the r€ar stabilizer bar, Likewise,
if the improved sound occurs when
your
6ars ars at a higher
position,
raige
the h€ight at tho ffont ofthe speaker
by slowly unscrewing ihe two melal cones on tho ftont stabilizer bar, Be sure not
to unscrew too
much, or the cones may come off.
Final
points
to rem€mber
You may want to r€peat tho sotup
proc€dures
at som€
point
after
you
have a chance
to live with the W-3s for a while.
You will find that subtle improv€ments can be made that
you
may have overlooked during the initial set-up.
Experimentation is
the
key to findlng the best
arrangements in
your
listening envhonmont. Bo
patient,
have fun, and
remember that
small changes in speaker
position
can sometimes have a significant efroct on the sound. ln addition,
room furnishings
play
an important role in absorbing and reflecting soundwaves. Midrange and high frequencies in
particular
will be absorbed by soft furnishings such as sofas, carpets and curtains. A large number of these sofl
furnishings will dr.ill the sound, while a "live" room with few furnishings will brighten the sound.
6.