


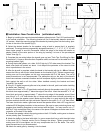
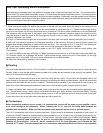

7. While holding the bracket flat against the rear side of the wall with one hand, attach the bezel to the bracket with ten
4 x XXmm flathead screws that line up with the ten raised bosses on the bracket (fig. 11). Tighten screws snugly, making
sure not to over-tighten, as this may compromise the fit of the bezel. The use of power screwdrivers is not recommended.
The absorptive strip on the back of the bezel's outer frame reduces unwanted vibrations against the drywall, and will
compress slightly to allow the frame to rest flush against the wall on all four sides. When installed correctly, the bracket
and bezel "sandwich" the drywall.
8. If the 6.2 Ci bezel frame and grille are to be painted in the wall, paint now before installing the baffle (see "Painting").
9. Add a 26" long piece of unbacked R19 fiberglass insulation to the enclosure. (Be sure to wear protective gloves and
goggles when handling fiberglass to avoid contact with the fiber). You may need to cut a 7" wide by 5" high rectangular
hole in the center of the piece of fiberglass to make room for the crossover on the back of the baffle.
10. Connect the speaker cable to the spring posts on the 6.2 Ci baffle, making sure to observe correct polarity (see
"Connections").
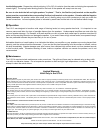
11. Attach the baffle to the bezel with eight 4 x XXmm panhead screws that line up with the eight holes in the bezel (fig.
12). Exercise caution not to damage the drivers. Tighten screws snugly, making sure not to over-tighten, as this may
compromise the fit of the baffle. The use of power screwdrivers is not recommended.
12. Attach the metal grille by inserting it into the bezel.
Painting
The bezel frame and grille of the 6.2 Ci are finished in a matte white powder-coated finish that may be painted to match
the wall. Keep in mind that the grille contains hundreds of tiny holes that are essential to the sound of the speaker. Take
care not to cover these holes with paint.
1. Paint the bezel frame and the grille at the same time using the same paint. Do not install the fiberglass sheet in the
space formed by the acoustic foam because overspray from painting will reduce its effectiveness. We do not recommend
painting while the baffle with the drivers is installed. The baffle itself is paintable if you remove the drivers; however, the
black finish of the baffle prevents the speaker's black drive units from being visible once the grille is in place.
2. When using spray paint, apply two thin coats, making sure to let the first coat dry completely before applying the sec-
ond. This will avoid running. When using a compressor and spray gun, apply the paint using its finest setting. Painting
with a brush is not recommended, but when necessary be sure to thin the paint so as not to cover the holes in the grille.
If paint does cover any of the grille holes, poke them out with a paper clip.
Connections
Before connecting speakers to your system, it is important that you turn off the power to your amplifier / receiv-
er to avoid damage to the equipment. Before installing the 6.2 Ci, map out the wiring paths between the
speakers and the amplifier. Make sure that the speaker cable does not rest on sharp or pointed objects.
The 6.2 Ci is compatible with virtually all quality amplifiers. Proper wiring of the speakers is essential to good sound. At
a minimum, 16AWG 2-conductor speaker cable is recommended for runs of 10 feet or less, with larger gauge special pur-
pose speaker cable suggested for longer runs. For best results, use equal length runs of cable for all speakers. When
permanently installing cable inside walls, be sure to use cable that is rated for in-wall use and has special
jacketing for fire prevention. In the U.S., the U.L. standard is CL-2, CL-3 and CM cable, and in Canada the CSA
standard is FT4 cable. The cables should be run in accordance with National Electrical Code and any applicable
Tech Tips: Optimizing Sonic Performance
Bass response is smoothest when the speaker is mounted within a rigid wall that flexes very little. For improved perfor-
mance, add 2"x4" cross-braces horizontally roughly 15 inches above and below the speaker location. Use wood glue and
extra screws when attaching the drywall to the studs around the speaker. Additionally, once the speaker cutout has been
made in the drywall, add a bead of wood glue inside the wall where the drywall meets the studs and cross-braces. If pos-
sible, use two layers of drywall for maximum rigidity.