95-7801 KIT ASSEMBLY
10
1
Disconnect the negative battery terminal to prevent an accidental short circuit.
2
3
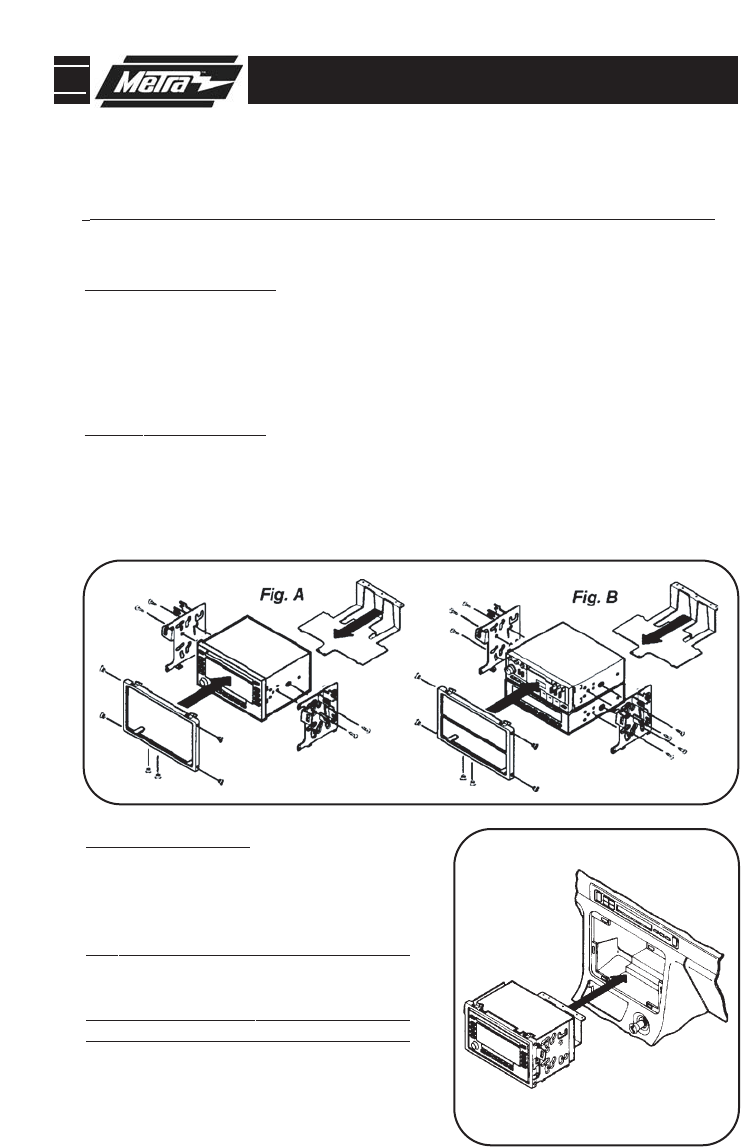
DOUBLE-DIN HEAD UNITS: Cut and remove the dividing rib from the radio opening. Cut and
remove all mounting tabs on the ISO Brackets, align the holes in the Brackets with the holes
in the head unit and secure with the screws included with the unit. Slide the Rear Support
Tray
under the unit. Position the Radio Housing over the unit and mount to the ISO Brackets
with (4) #6 x 1/4" Flat-head Screws supplied and to the Rear Support Tray with (2) #6 x
1/4" Flat-head Screws supplied (Fig. A). Skip to Final Assembly on page 11 for Step 4.
DOUBLE DIN RADIO PROVISION
*Note: Refer also to the instructions included with the aftermarket radio.
3b
STACKED ISO UNITS PROVISION
5
ISO ST
ACK HEAD UNITS:
Cut and remove all mounting tabs on the ISO Brackets, align the
holes in the Brackets with the holes in the head units and secure with the screws included with
the units. Slide the
Rear Support Tray under the units. Position the Radio Housing over the
units and mount to the ISO Brackets with (4) #6 x 1/4" Flat-head Screws supplied and to the
Rear Support Tray with (2) #6 x 1/4" Flat-head Screws supplied (Fig. B). Skip to Final
Assembly on page 11 for Step 4.
A
CCORD 1994-97, CL:
Secure the Mounting
Bracket (mounted to the bottom of the Rear
Support Tray) to the rear support provision in
the sub-dash with (2) bolts previously
removed. (
Skip to Final Assembly on page 11.)
CRV
, PRELUDE 1997-01, CIVIC 1999-00:
Snap the head unit/trim bezel assembly into
the sub- dash. (
Skip to Final Assembly on page 11.)
A
CCORD 1990-93,
ODYSSEY 1995-98, PRE-
LUDE 1992-96, INTEGRA, OASIS, VIGOR, TL:
Snap the head unit/kit assembly into the sub-
dash.
ACCORD 1998-02,
OD
YSSEY 1999-02:
Mount the head unit/kit assembly to the sub-
dash with (4) screws previously removed in
step #1. (
Skip to Final Assembly on page 11.)
3b
5


