


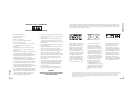

English
5
English
6
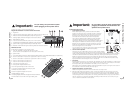
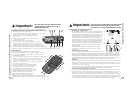
6. Wireless Rear Speakers
Plug in the wireless rear speakers and the Digital SoundTouch™ Control Center. When the link LEDs on
the back of the Control Center turn solid, and the LEDs on each rear speaker are solid blue, the system
is connected.
7. Use the remote control or the control pod to select an input source.
8. When using a digital connection: Follow the instructions on the audio device to enable/confirm digital
audio output.
9. For 5.1 output: Enable Dolby® or DTS® output on your game or movie. Follow the game or movie audio
menu for instructions.
10. If using digital content: The control pod will automatically detect and display the digital stream you
selected in step 7.
If the effect does not appear on the control pod, see the troubleshooting section of this guide.
11. If using stereo content: The effect button allows you to select between Stereo (front left/right speakers
only) and Dolby® Pro Logic® II Music or Movie Mode to create 5.1 audio from a 2-channel stereo source.
12. Once the input and effect are correctly displayed on the control pod, you are ready to enjoy your
new speakers.
Pairing the Wireless Rear Speakers
The wireless rear speakers are automatically paired with the system at the factory. When you fi rst setup the
system, the system will automatically locate the rear speakers. A successful connection is indicated by solid
LEDs on both the Digital SoundTouch™ Control Center and the wireless rear speakers.
Troubleshooting the Wireless Rear Speakers
If the wireless rear speakers lose their connection to the system, fi rst use the Wireless LEDs to diagnose the
problem (see below). To re-establish a link, fi rst locate the pinhole for the connect button on the bottom of
the Control Center. Using a paperclip, push the connect button through the pinhole. The system will start
looking for the wireless rear speakers, as indicated by the fl ashing Link LEDs on the back of the Control Center.
The system will continue looking for the rear speakers for 2 minutes.
During the 2 minutes that the system is searching for the rear speakers, open the sealing plug on the back of
each rear satellite. Using a paperclip, push the connect button through the pinhole on the back of the rear
speakers. The speakers will start searching for the system, as indicated by the fl ashing blue LEDs on the front
of the speakers. Once the speakers link up with the system, all LEDs will change to a solid color.
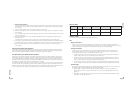
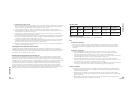
Wireless LEDs
Speaker Cables
3 x 15’ (4.6m) lengths of standard 20 gauge speaker wire.
PCs
Digital Connection
If your sound card has a digital output jack, you can use it to connect to the Digital SoundTouch™
Control Center. The control center supports either an optical or a coaxial connection. Check your sound
card documentation for instructions on how to enable the sound card’s digital output.
Analog Connection
Use the 6-channel direct input cables to connect the Digital SoundTouch™ Control Center to the
analog jacks on your sound card. For optimal sound, connect only those cables necessary for your
sound card and leave the other cables unattached at both ends:
• 6-channel sound card: Connect the orange, black, and green plugs to the Digital SoundTouch™
Control Center and to the color-coded jacks on the sound card.
• 4-channel sound card: Connect the green and black plugs to the Digital SoundTouch™ Control
Center. Connect the green plug to the sound card’s front jack and the black plug to the sound
card’s rear jack. Leave the orange plug unattached at both ends.
• 2-channel sound card: Connect the green plug to the Digital SoundTouch™ Control Center and to
the “line out” jack on your sound card. Leave the orange and black plugs unattached at both ends.
System States
Your Z-5450 Digital speakers have two basic states: Standby (off), and Ready. There is also a main on/
off switch on the rear of the subwoofer (see the quick start guide).
• Standby (Off): The power to the front/center speakers is off, the rear wireless speakers are in
standby mode, the LCD is blank, and the power LED is red. Use the standby button to turn the
system on.
• Ready (On): The speakers are on and the power LED is blue. Pressing the standby button will put
the system into standby (off) mode.
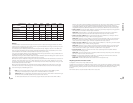
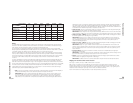
LED States No power Searching System Standby Ready (Power On) Data Loss
Control Center Off Fast Flashing Green Off Solid Green Slow Flashing Green
Rear Speaker Off Flashing Blue Solid Red Solid Blue Flashing Blue/Red
Setup
Setup