


English
3
English
4
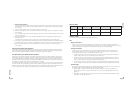
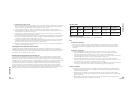
Initial Setup Overview:
1. Front Satellite Speakers
Before attaching the cables, position the two front satellite
speakers on either side of your computer monitor or television
about the same distance from each other as from you. Angle
them to face you. Place the two rear speakers behind you
and about the same distance apart as the front speakers.
Your Logitech® Z-5450 speaker satellites are wall mountable.
Unscrew the satellite stand from the satellite speaker base,
exposing the stability pins on the base. Rotate the speaker stand
180 degrees and reattach the stand to the base, ensuring the
stability pins line up with the openings provided. Do not over
tighten the screw. Mount the speakers using appropriate wall
anchors through the holes in the stands.
For a pro-audio look, remove the cloth grilles by pulling them straight
off. Removing the grilles will not affect sound quality.
2. Center Channel Speaker
Depending on your configuration, place your center channel speaker
on your desk (angled up), on top of your monitor or television (angled
down), or wall-mounted (angled down). Your Logitech® Z-5450 speaker satellites are wall mountable.
Unscrew the satellite stand from the satellite speaker base, exposing the stability pins on the base.
Rotate the speaker stand 180 degrees and reattach the stand to the base, ensuring the stability
pins line up with the openings provided. Do not over tighten the screw. Mount the speakers using
appropriate wall anchors through the holes in the stands.
3. Subwoofer
Because bass frequencies are non-directional, the subwoofer can be placed anywhere in relation to the
other speakers. To ensure optimum sound quality, do not block the driver or the bass port. To achieve
the strongest bass, place the subwoofer near a wall, corner or under a desk.
Note: Please ensure adequate ventilation around the subwoofer. Keep the cooling fins on the back of
the subwoofer at least 6 inches away from any object.
4. Digital SoundTouch™ Control Center
Position the Digital SoundTouch™ Control Center where it is easy to reach.
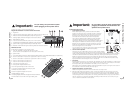
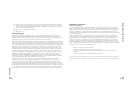
5. With the power off and the speakers in place, connect the speaker wire to the spring clips on the
front and center satellite speakers and to the corresponding spring clips on the subwoofer. For each
speaker wire, make sure to match the red and black spring clip terminals on the subwoofer with the
corresponding terminals on the speakers. To connect, push the tab on the spring clip, insert the wire
into the connector, and release the tab. Make sure that you match the wire color to the spring clip
colors on both the subwoofer and the satellite.
To setup your system, see the Quick Start guide.
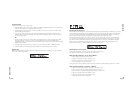
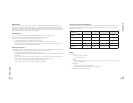
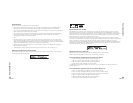
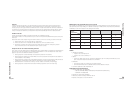
Digital SoundTouch™ Control Center Overview
1. Digital LCD
2. Input: Use to select audio source (Optical 1-2, Coax, 6 ch. Direct or Stereo 1-3)
3. Effect: Use to select sound effect (Stereo, Dolby® Pro Logic® II, etc.)
4. Settings: Adjust parameters of digital surround sound effects
5. Mute: Mute the system
6. Level: Use to select subwoofer, center, rear or main volume
7. Pro-audio style knob: Adjusts volume, subwoofer, center, and other levels
8. System Power: Toggles between Ready and Standby modes
9. Antenna: Transmits left and right rear audio signals to the wireless rear speakers
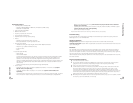
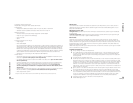
Remote Control
All functions are available on the remote control
1. Test: The Test State is only available from the remote.
See the section on “Test State” for a full description of this mode.
2. System Power
3. 6 ch. Direct / Stereo 1: Select 6 ch. Direct Input source (when in Stereo 1-3, this button will select Stereo 1 input source)
4. Stereo 2: Select Stereo 2 input source (only works in Stereo 1-3 mode)
5. Stereo 3: Select Stereo 3 input source (only works in Stereo 1-3 mode)
6. Optical 1: Select Optical 1 input source
7. Optical 2: Select Optical 2 input source
8. Coax: Select Coax input source
9. Sub up/down: Adjust subwoofer level
10. Center up/down: Adjust center channel level
11. Surround up/down: Adjust surround (rear) level
12. Effect: Select sound effect
13. Volume up/down: Adjusts main volume
14. Mute: Mute the system
15. Settings: Adjusts parameters of digital surround sound effects
This information is also shown on the Quick Start guide.
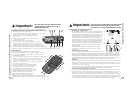
Important:
For your safety, set up the entire system
before plugging it into a power source.
Important:
For your safety, set up the entire system before
plugging the subwoofer and the wireless rear
speakers into a power source.
6
c
h
. dir
e
c
t
/
st
e
reo 1
st
e
reo 2
st
e
reo 3
o
pt
ical
1
o
pt
ic
a
l
2
m
ut
e
c
oa
x
ial
test
volum
e
sub
e
ff
ect
sur
rou
nd
c
enter
settings
Connecting Your Speakers
Digital SoundTouch™ Control Center & Remote Control
5
6
7
81
234
1
3
6
2
5
8
11
15
12
10
14
4
7
9
13
9