


Rechargeable batteries are pre-installed.
a. Turn off the HM-70 by sliding the
ON/OFF switch all the way down
and turn off the 705iR.
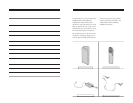
b. Connect one end of the charging cable
to one of the CHARGE jacks on the
back panel of the 705iR. Connect the
other end of the charging cable to the
charging jack on the side of the HM-70.
e power indicator LED will glow
green when the charging cable is
connected and charging correctly.
c. e batteries fully charge in 8 to 12
hours. Once the batteries are charged,
remove the charger cable from the
HM-70.
NiMH batteries maintain their charge for
a full day of normal classroom use. Always
turn the HM-70 off when not in use.
e Channel A/B switch is located inside
the battery compartment.
e switch is set to
Channel B at the factory.
a. Slide the ON/OFF switch on the side of
the HM-70 all the way up. e power
indicator LED will glow red and stay on.
(ere is a center MUTE position if you
wish to leave power on but temporarily
cease transmission of your voice.)
b. Do not adjust the audio gain adjuster
that is located in the battery compart-
ment. It has been preset by factory
technicians and is not intended as a
volume control.
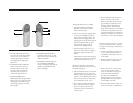
a. When holding the HM-70, grip the
barrel in the center, silver section
below the ON/OFF switch. Do NOT
grip the HM-70 around the bottom,
covering the black infrared sensors
encircling the base. is interrupts
signal transmission from the microphone
to the receiver. Speak directly into the
top of the microphone at a normal level,
holding the head about 2 inches from
your mouth, no lower than chin height.
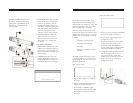
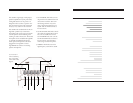
Below are instructions on how to connect
an external audio device like a computer,
CD player, cassette player, VCR and TV to
the 705iR.
1. Connect a cable from an audio source
to the 3.5 mm AUX IN jack next to
the AUX IN volume knob on the top
of the 705iR.
2. With the 705iR turned on, adjust the
AUX IN volume to a desired level.
1. Using a cable with a 3.5 mm connec-
tor at one end, connect the AUX
OUT of the 705iR to the input jack
of the FM transmitter. Different
manufacturers use different size
audio input jacks on the transmitter.
e LightSPEED LES-370 requires a
the CA-MMC 3535 cable.
2. With the 705iR turned on, adjust the
AUX OUT volume to a desired level.
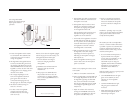
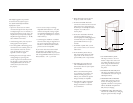
1. ON/OFF SWITCH: is switch,
located on the side of the LightMic,
turns the unit on or off. e red
triangle-shaped LED on the front
of the LightMic will light when
power is on.
2. CHANNEL SELECT SWITCH:
is switch allows for selection
between Channel A or B. If you
are using a single microphone/
transmitter for your system, we
recommend using Channel A.
3. POWER/CHARGE LED
INDICATOR: is triangle-shaped
LED is two-color. It glows red when
the LightMic is powered on, green
when charging and goes out when
fully charged.
4. EXTERNAL MICROPHONE
CONNECTOR: Use the 3.5 mm
MIC jack for the optional TK-250
headset microphone.
5. CHARGER CONNECTOR: Use
the jack labeled CHARGER to
connect the charging cable from the
705iR to the LightMic for daily
battery recharging.