


However, do not leave the LightMic plugged
into the charger for more than 10 days, as it
will significantly shorten battery life.
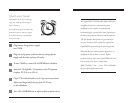
f. Once the batteries are charged,
remove the charging cable from
the LightMic.
g. NiMH batteries will maintain their
charge for a full day of normal
classroom use.
h. With proper care, NiMH batteries
will provide service for at least one
year. If battery or charging problems
occur, contact LightSPEED Service at
800.732.8999.
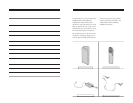
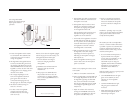
a. Ensure the LightMic and the 705iR
are turned OFF. e 705iR must be
connected to AC power in order to
charge the LightMic.
b. e LightMic’s rechargeable batteries
are factory installed. Plug one end of
the charging cable firmly into the jack
labeled CHARGER on the side of the
LightMic. Connect the other end of the
charging cable to the charging jack on
the back of the 705iR.
c. e triangle-shaped light on the
front of the LightMic transmitter
glows green when the cable is
connected and charging correctly.
e light goes out when fully charged.
d. e batteries will fully charge in
about 8 to 12 hours.
e. It is best to leave the LightMic
charging until used, since the
batteries slowly lose their charge
when not in use.
e rechargeable NiMH
batteries must be fully charged
before regular classroom
operations.
(is is not covered by the warranty.)
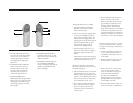
a. e LightMic has a built-in microphone.
Once the transmitter is switched on, the
microphone is activated.
b. e LightMic may be used as a hand-
held mic or a hands-free pendent style
microphone by clipping the LightMic
on the supplied lavaliere cord.
Place the lavaliere cord around your neck,
and adjust the length so the top of the
LightMic rests on the collar bone.
c. On the side of the LightMic is the Chan-
nel A/B slide switch. Slide the switch to
the “A” position. (If a second LightMic
is used for simultaneous operation, set
one LightMic to Channel A and the
second LightMic to Channel B.)
d. Slide the ON/OFF switch on the side of
the LightMic to ON. e triangle-
shaped light on the front glows red,
indicating the microphone is charged
and ready for use.
e. When the LightMic transmitter power
switch is slid to OFF, the microphone
power is turned off.
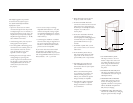
Volume is set by adjusting the volume control
on the 705iR.
a. Make sure the 705iR is switched ON.
b. Ensure the LightMic is switched ON and
the triangle-shaped LED on the front of
the LightMic is glowing red. e LED
next to the CH A knob on the 705iR
will also glow, indicating that the 705iR
is receiving the LightMic signal and is
ready for use.
c. Adjust the volume of the receiver by
turning CH A POWER clockwise. Be
careful not to stand directly in front of
the speaker as feedback may occur.
d. Speak at a normal level and slowly
turn the volume knob clockwise to
increase the loudness of the speaker
until the sound level is adequate for
the room.
Feeedback or “squealing” may occur if the
volume is set too high. Reducing the loudness
of the speakers with the volume control
usually eliminates feedback.
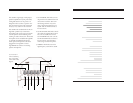
e 705iR system has two independent
receivers—Channel A and B. is makes
it possible to operate two transmitter/mi
-
crophones simultaneously. Follow the
instructions below when using a second
transmitter/microphone:
a. Set each transmitter/microphone to
separate channels. For example if
you are using two LightMics, set one
to Channel A and the other to
Channel B. If you are using one
LightMic and one HM-70 handheld
microphone, set the LightMic to
Channel A and the HM-70 to
Channel B.
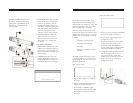
When the 705iR is receiving a signal from the
transmitter microphone(s):
• CH A POWER indicator will glow
green on the 705iR if you select
Channel “A” on the LightMic
transmitter.
• CH B VOLUME indicator light
will glow green if Channel “B”
is selected.
• When simultaneously operating two
transmitters/microphones, both
indicator lights will glow.