


23) Channels On Indicator: Channels are active when LED is lit.
24) Playback Volume: Controls the volume from the Playback RCA input jacks (25).
NOTE: The Playback feature is not affected by the Main Master control and will remain
active even when the mute function is active via the footswitch.
25) Playback RCA Jacks: Input connector CD, Tape or any line level stereo signal source.
Allows you to play recorded music through the mixer.
26) Record RCA Jacks: Output connectors to send line level signal to a record device such as a tape recorder or
computer.
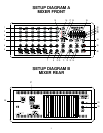
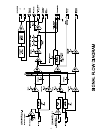
REAR PANEL
27) AC Cord Connector: Insert the AC cord (supplied) firmly into the AC connector.NOTE: Replace the AC power
cord if protective jacket is damaged or round ground pin is damaged or removed.
28) Power Switch: The KPM7200 is turned ON when the switch is in the UP position.
Press the switch to the DOWN position when not in use.
29-30) Speaker: Connectors for 8 Ohm speaker cabinets each.
NOTES: #1 do not connect more than two 8 Ohm speaker cabinets to the output of the KPM7200 mixer/amplifier.
Total load must not go below 4 Ohms.
#2. It is not necessary to use both A & B output jacks.
The KPM7200 will operate at 8-16 Ohms.
QUICK-START SETUP INSTRUCTIONS
Making Connections:
• Connect 1/4" non-shielded speaker cables to the speaker out jacks on the rear of the KPM7200 (29 & 30),
then connect the opposite end of each speaker cable to the speaker enclosures.
• Connect instruments and microphones into the appropriate input connectors located on the front of the mixer.
Low Impedance Microphones (6), Line Level (5), High Impedance Instruments (7 &8), tape/CD (25).
• Make sure the power switch is turned to the off position and attach the AC power cable into the fused AC
input (27) located on the rear of the mixer.
Master Section:
• Turn the Main Master control (20), and Playback Master (24) counter clockwise.
• Adjust the master equalizer slide controls (19) to the center 0dB position.
Input Section:
• Turn all channel volume controls (4) counter clockwise.
• Turn all tone controls (3) to the 12 O'clock position.
4