


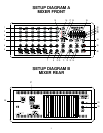


EXPLANATION OF CONTROLS
FRONT PANEL
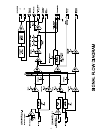
1) Effects Controls: Adjusts the amount of signal that is sent to the digital effects processor.
2) Monitor Controls: Adjusts the amount of signal that is sent to the Master Monitor control.
3) Tone Controls: Adjusts the balance of bass and treble from the individual channels.
4) Main Controls: Adjusts the volume of the individual channel.
5) Line Input: Input connection for 1/4" line level sources (Keyboards, drum machines, etc.)
6) Microphone Input: Input connection for balanced Low-Z signals (Microphones, etc.)
7-8) Instrument Inputs: Input connection for instruments (Acoustic Guitars, Electric Guitars, etc.)
9) Effects Send: Output connector used to send a line level signal from the KPM7200 to an
outboard effect. This connector takes a signal feed from the individual channel's Effects controls.
10) Aux Return: Input connector used to receive a signal from an outboard effect or signal source. The signal from
this connector is fed to the effect Master (16) control. The Effect Master control (16) will adjust the volume of this signal
source.
11) Preamp Output: Line level output for the preamp. This control takes a signal feed from the Main Master control.
12) Power Amp Input: Input connector for the Power Amp. NOTE: When a line level signal source is inserted into
this connector, the signal from the Kustom KPM7200's individual channels are disconnected and will not function. Only
the outboard signal source will be amplified.
13) Monitor Output: Output connector to send a line level signal to a monitor amplifier or powered monitor.
14) Footswitch: Standard Tip-Ring-Sleeve wired footswitch to turn digital effects on and mute the channels of the
KPM7200. Tip connection turns the Effects on and off. The Ring connection will mute the individual channels.
15) Digital Effects Indicators: These LED's show what digital effects have been chose. NOTE: No LED's are lit
when the Effects are muted via footswitch.
16) Effects Master: Controls the volume of digital effect signal to the Main Master control.
17-18) Effect Select: These two push buttons will scroll through the digital effect options. Pressing the UP button will
advance the digital effect selection to the next selection higher than the present selection. Pressing the DOWN
button will advance the digital effect selection to the next selection lower than the present selection. NOTE: When
scrolling past the top or bottom of the effects selection, the effects selection will automatically go to the opposite end
of the selections.
19) Equalizer: These controls adjust overall tone of the mixer. Each slide control adjusts the amount of specific
frequencies + or
– 12dB.
20) Main Master: Controls the total volume on the individual channels. NOTE: The playback volume is not affected
by the Main Master control.
21) Power On Indicator: Power is on when LED is lit.
22) Monitor Master: Controls the total volume of the individual channel's monitor sends.
NOTE: The Monitor output is still active when Main channels are muted via footswitch.
3