


11
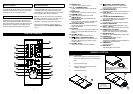
DIGITAL CLOCK AND TIMER
Setting the digital clock
12
To switch to the clock display while in tuner and CD
modes, press DISPLAY MODE. The time is
displayed for approximately 10 seconds. The time is
also displayed when the unit is turned off.
Setting the timer
You can set automatic switch-on and switch-off
times with the built-in timer. Before you do this, be
sure the clock is set correctly.
With the unit on, press DISPLAY MODE (17)/
(48), as required, until TIMER ON appears in
the display.
Press MEM./CLK ADJ. (50). The hour flashes.
Use the TUNING + SKIP/SEARCH or
TUNING - SKIP/SEARCH to set the hour of the
desired switch-on time.
1.
2.
3. To set the minutes, press the MEM./CLK ADJ.
again and use TUNING + SKIP/SEARCH
and TUNING - SKIP/SEARCH to adjust.
Confirm by pressing MEM./CLK ADJ.
4. Press DISPLAY MODE to proceed to setting
the switch-off time.
5. Set the switch-off time using the same
procedure as switch-on time setting.
6. Press DISPLAY MODE, as required to check
the current time, Timer On, and Timer Off.
7. Press TIMER (22)/(54) to activate the timer.
When the unit is on standby it will automatically
switch on for the programmed length of time.
The unit automatically selects the operating mode
(CD or TUNER) it was in when last switched off.
Make sure the tuner is tuned to a radio station, or for
CD operation, a CD must be inserted.
Snooze function: When the unit is switched on by
means of the timer, you can press the SNOOZE
button (23)/(37) to switch the unit off for
approximately 9 minutes. After this time, the unit
switches on again. You can press SNOOZE again,
or switch the unit off by pressing POWER.
Setting the sleep timer:
When the unit is in operation it can be set to
automatically switch-off 10 to 120 minutes later.
Press SLEEP (25)/(52), as required, until the
desired delay time appears on the display. The
SLEEP timer can be set for: 120, 90, 60, 50, 40, 30,
20, and 10 minute intervals. The unit automatically
turns off after the entered time has elapsed.
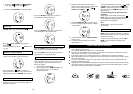
COMPACT DISC CHANGER
Safety notes for operation of the CD changer
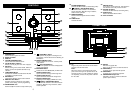
Press one of the "OPEN / CLOSE" buttons (15) or
(16) to open the right or left CD cover (2) or (26).
The right and left CD cover do not opened or closed
at the same time. Make sure the cover is not
obstructed by any objects. This must also be
ensured when closing the CD cover. The disc
loader may only be opened or closed by pressing
either the button "OPEN / CLOSE". Take care that
no foreign objects can fall into the unit when the
disc compartment is open.
Under no circumstance should the laser pick up
lens be touched. Never look directly at the
beam.
CD changer operation
Switch the unit on by pressing the “POWER”
button (1)/(32). To turn on the CD mode, press the
button “ PLAY / PAUSE” (13)/(38) or any
one of the DISC 1-4 buttons (5) or (49). If one or
more CD(s) have already been inserted in the
chosen location(s), playback is started.
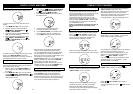
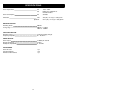
(TOC means Table of Contents) If there is no CD
inside, the following will appear after a few seconds:
Inserting and ejecting the CD
The CD compartment (2)/(26) is opened for
inserting or removing compact discs by pressing the
"OPEN / CLOSE" (15) or (16) button.
Insert the disc with the unlabelled side facing the
unit. Press the centre of the CD onto the black
holder that is fitted with 3 retaining bearings.
To remove the CD, hold it by the edges and lightly
press on the holder to remove it.
Then close the disc compartment by pressing the
“OPEN / CLOSE” button (15) or (16).
After having closed the disc cover, the CD system
immediately begins to scan the content of the
compact disc. Subsequently, the number of tracks
and the play-back time of the compact disc
occupying position 1 appear in the display unit (3).
Playing the entire CD
Select the desired CD with the button “CD
SELECTION 1 - 4” (5) or “DISC 1 - 4” (49) on the
remote. Playback begins automatically.
If the playback of one CD has finished, the playback
of the next inserted CD begins, and so on.
Note: If the CD player is in stop position, you can
start the currently indicated CD by pressing the
button “ PLAY / PAUSE” (13)/(38).
If you select a different CD by pressing the buttons
“CD SELECTION 1 - 4” (5) or “DISC 1 - 4” (49),
playback will start automatically.
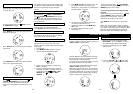
Pause / stop
To briefly interrupt playback, press “ PLAY /
PAUSE” button (13)/(38). The display indicates:
Press “ PLAY / PAUSE” button again to
restart play.
To end the playback, press the “STOP” button
(11)/(45).
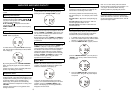
When you first plug in the unit, the display shows:
To set the clock to the current time proceed as
follows:
1. Press MEM./CLK ADJ. The hour flashes.
2. Enter the hour by pressing the buttons
TUNING + SKIP/SEARCH or
TUNING - SKIP/SEARCH.
3. Confirm the entry by pressing MEM./CLK
ADJ. The minutes will flash.
4. Enter the minutes by pressing the buttons
TUNING + SKIP/SEARCH or
TUNING - SKIP/SEARCH and confirm with
MEM./CLK ADJ.