


7
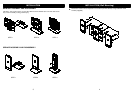
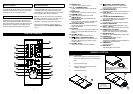
Antenna connection
You can achieve acceptable reception if you use
the supplied FM “pigtail” antenna. If so, the antenna
should be elongated and not coiled or bunched up.
If it hangs freely, it can be quite effective.
Speaker connection
AC power connection
Connect the power cable (included in the
accessories) first to the power socket (27) at the
unit and then insert the power plug into the wall
outlet. When you disconnect the plug from a socket,
do not pull the cable, always pull the plug.
Note: As soon as the unit has been connected to
AC power, parts of the unit are in operation, due to
the standby function. To switch off the unit
completely, remove the plug from the AC outlet.
Once the unit is plugged in, its time display (3)
starts flashing, refer to "Setting the digital clock"
on P.11.
8
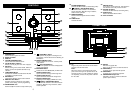
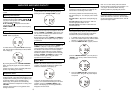
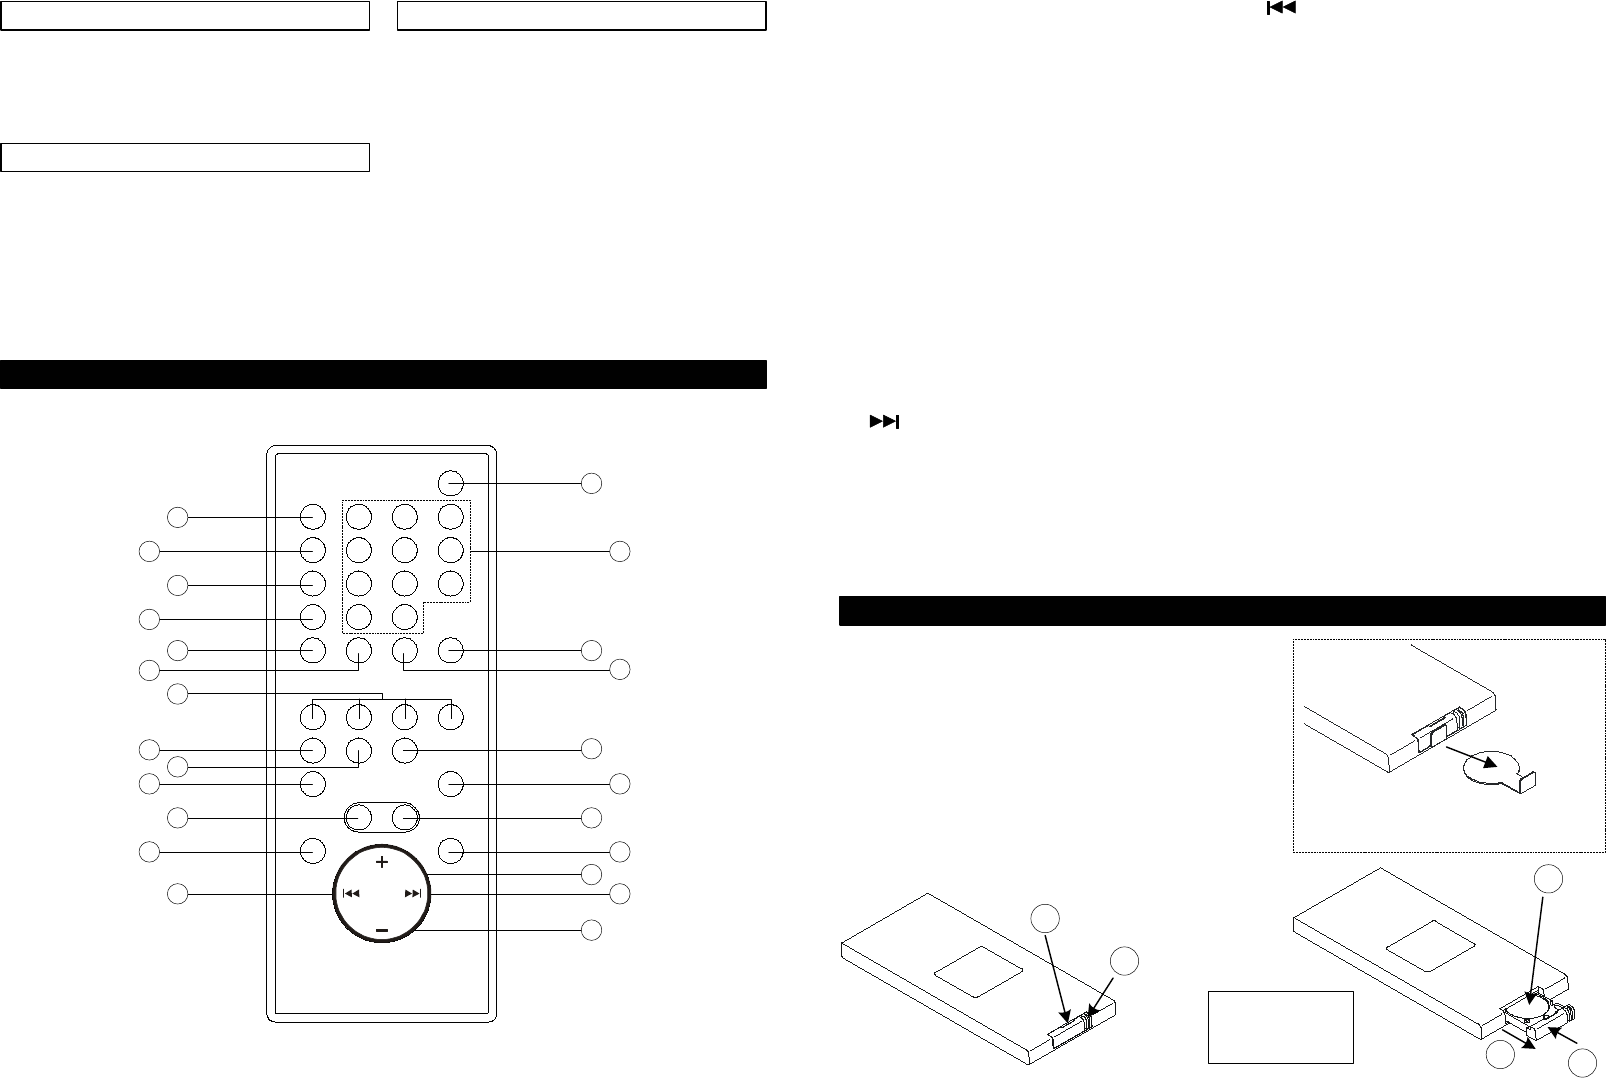
REMOTE CONTROL
32
33
34
35
36
37
38
39
40
41
42
43
44
45
46
47
48
49
50
51
52
53
55
54
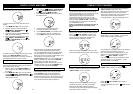
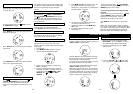
REMOTE CONTROL
1a
1b
2
3
Remove the battery tray by pressing point (1a)
inside, then sliding point (1b) area at the same
time.
Pull out the battery tray.
Install or replace the button-type battery
“CR2032” (supplied).
Close the battery tray.
4
1.
2.
3.
4.
Battery Installation
Note: Pull out insulation tag from the
button battery tray before operating the
remote control.
Warning: Danger of
explosion if battery is
incorrectly replaced.
Replace only with the
same or equivalent type.
POWER Button
Used to turn the system on and off
0 - 9, +10 NUMERIC Button
Recalls TUNER preset stations / Recalls CD
tracks
INTRO Button
Plays the first 10 seconds of each CD track
RANDOM Button
Randomizes the playback of CD tracks
PRESET Button
Retrieves preset AM and FM radio stations
SNOOZE Button
Turns off the unit for 9 minutes, after which the
unit will then resume its previous function
PLAY/PAUSE Button
Initiates CD operation and starts CD playback /
pauses CD playback
EQ Button
Selects among “FLAT, POP, ROCK, JAZZ and
DISCO” as the tonal qualities desired for any
selection
VOLUME + Button
Adjusts to the desired volume (louder)
TUNING + SKIP/SEARCH Button
CD forward title selection / CD forward search
operation / Manual tuning of stations, station
search operation
VOLUME - Button
Adjusts to the desired volume (download)
TUNING - SKIP/SEARCH Button
CD backward title selection / CD backward
search operation / Manual tuning of stations,
station search operation
FOLDER DOWN Button
Activates the MP3 folders (in descending order)
STOP Button
Stops CD playback / Clears the CD program
memory
FOLDER UP/STEREO/MONO Button
Activates the MP3 folder (in ascending order) /
Stereo/mono switching for FM stations
REPEAT Button
Selects among CD playback repeat functions
DISPLAY MODE Button
Switching to time display (TIMER ON / OFF)
DISC 1 - 4 Button
Selects a CD to play from one of the 4 players
MEMORY/CLK ADJ. Button
Supplies memory functions for tuner station
presets, clock setting, and CD programming
MP3 MODE Button
Selects TITLE or ALBUM(folder) in MP3 mode
SLEEP Button
Set the automatic switch-off time
TUNER/BAND Button
Activates the TUNER and selects the AM, FM,
or FM/Stereo reception bands
TIMER Button
Activates the timer
MUTE Button
Temporarily silences the audio
40.
41.
42.
43.
39.
38.
37.
36.
35.
34.
33.
32.
53.
54.
55.
52.
51.
50.
48.
47.
46.
45.
44.
49.
Insert LEFT spkr’s striped wire into LEFT channel’s
SPKR block (30) by pressing the RED lever and
inserting the striped wire into the open hole. Do the
same with the LEFT speaker’s non-striped wire and
the BLACK lever. Repeat for the RIGHT channel
SPKR block (29) and the RIGHT speaker’s wire.