


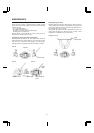


i Cassette operation buttons (deck B)
: Press to wind the tape quickly from right
to left.
: Press to wind the tape quickly from left to
right.
(stop) : Press to stop the tape. Also press to stop
both decks simultaneously during dub-
bing.
PLAY : Press to start playback/recording.
REC/
REC MUTE
: Press the PLAY button while pressing
this button to start recording, and press
to leave an appropriate non-recorded
section. (See page 10.)
PAUSE : Press to stop the tape temporarily during
recording and playback. Press the PLAY
button to release the pause mode.
(direction) : Press to change the direction of tape
travel.
o DOLBY NR button and indicators
Set to B or C for recording using the Dolby NR system or for
playing back a tape that was recorded using the Dolby NR
system. Each time the button is pressed the NR mode
changes and the indicator lights. (Dolby B NR -> Dolby C NR
-> NR OFF -> Dolby B NR ...)
Set to OFF when the Dolby NR system is not used.
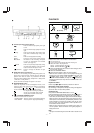
p REVERSE MODE button
Select the single side or full record/playback mode, or the
continuous play mode. Each time the button is pressed the
mode changes. (
-> -> -> ...) The current mode
can be checked with the mechanism mode indicator.
: For single-side recording or playback.
: To play or record both sides A and B.
: To play sides A and B continuously.
a A
B SYNCHRO DUBBING buttons
Press to dub from deck A to deck B.
•
NORM SPEED : Press to perform normal-speed dubbing.
•
HIGH SPEED : Press to perform high-speed dubbing.
PLAYBACK
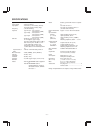
Playback of deck A
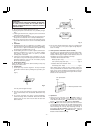
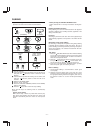
Operate in the order of the numbers in the illustration.
1 Turn the power on.
2 Load a prerecorded cassette with side A facing out.
3 Select the side to be played back.
Side A... Forward direction (PLAY
)
Side B... Reverse direction (
PLAY)
4 Press the DOLBY NR button to set the same setting as when
the tape was recorded.
5 Select the REVERSE MODE.
6 Press the PLAY button of deck A to start playback.
•
When the deck contains a tape, it can be played back by just
pressing the PLAY button in the B version only when the
POWER switch is set to ON and the switch is at
STANDBY. In the J version, the tape can be played back by
pressing the PLAY button only when the POWER switch is set
to STANDBY.
Playback of deck B
Perform steps 2 to 6 of the above procedure for deck B.
Microphone mixing during playback
By connecting a microphone, microphone mixing with playback
sound from deck A or deck B is possible.
Continuous play
First press the REVERSE MODE button to set to
.
Load cassette tapes in both decks and press the PLAY button of
the deck to be played first for continuous play of both decks.
•
At this time, the CONT indicator lights in the multimode display.
When the tape in the deck which plays first reaches the end of
side B (in the reverse direction), it automatically switches to the
forward direction and enters the standby mode. At the same
time, the other deck starts playback. These operations con-
tinue between decks A and B.
•
While one deck is playing back, the cassette in the other one
can be replaced. This is convenient for long-time playback of
background music.
Note:
•
Use tapes recorded using the same NR mode in decks A and
B.
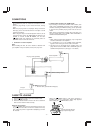
123
4 567 8 94
8
1
POWER
ON
OFF
STANDBY / ON
(B version)
POWER
(J version)
2
A
3 4
DOLBY NR
B
C
5
REVERSE
MODE
6
PLAY
–7–
id8/i10371/ 09/23/99 Page 7