


INTRODUCTION
Thank you for purchasing a JVC product. Read this instruction
book carefully before operating to be sure of getting optimum
performance and longer service life from the unit.
CONTENTS
Features .................................................................................... 3
Auto reverse operation ............................................................. 3
Cautions .................................................................................... 3
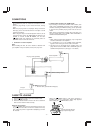
Connections .............................................................................. 5
Cassette loading ....................................................................... 5
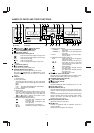
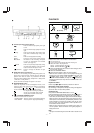
Names of parts and their functions .......................................... 6
Playback ................................................................................... 7
Multi music scan ....................................................................... 8
Recording ................................................................................. 8
Compu link control system ..................................................... 11
Dubbing .................................................................................. 12
Maintenance ........................................................................... 13
Troubleshooting ...................................................................... 14
Specifications .......................................................................... 15
FEATURES
1. Double auto-reverse mechanism for recording/playback
in deck B and playback in deck A
2. The COMPU CAL function automatically sets the
record/playback flat frequency characteristics and opti-
mal record/playback tape sensitivity for bringing out
maximum tape performance.
3. Full logic mechanism
4. Dolby* HX PRO headroom extension
5. DolbyB&Cnoise reduction system
6. DDRP (Dynamics Detection Recording Processor) com-
patibility
The DDRP function is possible only when used with a suit-
able JVC CD player.
7. 2-color FL peak level indicator
8. Digital tape counter respectively for deck A and deck B
9. Synchro start (normal-/high-speed) dubbing
10. Auto tape select mechanism (decks A and B)
11. Multi music scan mechanism for either direction
‘‘Under License of Staar S.A., Brussels, Belgium’’
12. PITCH control
13. Microphone mixing is possible
14. COMPU LINK-3 compatible
*
Dolby noise reduction and HX Pro headroom extension
manufactured under license from Dolby Laboratories
Licensing Corporation. HX Pro originated by Bang & Olufsen.
*
‘‘DOLBY’’, the double-D symbol
and ‘‘HX PRO’’ are trade-
marks of Dolby Laboratories Licensing Corporation.
COMPU LINK control system is the convenient system using
COMPU LINK-3/SYNCHRO terminals on the rear panel.
(See page 5 and 11.)
This product can be combinated with a DDRP (DYNAMICS
DETECTION RECORDING PROCESSOR) system (compact
disc player + cassette deck, etc.) to enable setting the opti-
mum recording level automatically. Refer to these instruc-
tions for details.
AUTO REVERSE OPERATION
The auto reverse operation of this unit turns the tape transport
over to the reverse of forward direction automatically when the
tape reaches its end during recording or playback.
•
Because of cassette shell construction, a tape recorded in the
forward direction should be played back in the same direction
to obtain stable sound reproduction.
•
During recording, auto reverse can be activated only from the
forward to the reverse direction. For good sound quality and to
avoid accidental erasure of previously recorded material,
always start recording with the side A of the tape facing out.
CAUTIONS
1. Prevention of Electric Shocks, Fire Hazards and Damage
1) Even when the POWER switch is set to STANDBY, a very
small current will flow. To save power and for safety when
not using the unit for an extended period of time, disconnect
the power cord from the household AC outlet. (for the J ver-
sion)
Set the
POWER switch to the OFF position when not in
use. (for the B version)
2) Do not handle the power cord with wet hands.
3) When unplugging from the wall outlet, always grasp and pull
the plug, not the power cord.
4) Consult your nearest dealer when damage, disconnection, or
contact failure is found with the cord.
5) Do not bend the cord sharply, or pull or twist it.
6) Do not modify the power cord in any manner.
7) Do not remove screws to disassemble the unit and do not
touch anything inside the unit.
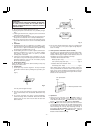
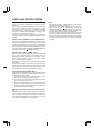
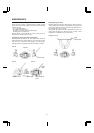
8) AC power cord (For the J version only)
The AC power cord of this unit has certain one-way direction
connections to prevent electric shock. Refer to the illustration
for correct connection. (Fig. 1)
Fig. 1
(For CANADA)
CAUTION
TO PREVENT ELECTRIC SHOCK, MATCH WIDE BLADE
OF PLUG TO WIDE SLOT, FULLY INSERT.
–3–
id8/i10371/ 09/23/99 Page 3