


39
English
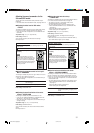
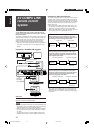
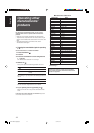
On the front panel:
Before you start, remember...
There is a time limit in doing the following steps. If the setting is
canceled before you finish, start from step
2
again.
1
Select and play any source other than “DVD
MULTI.”
• Make sure you have selected the input mode (analog or
digital) correctly.
2
Press SURROUND.
MULTI JOG now works for selecting Surround/DSP modes.
3
Turn MULTI JOG to select the Surround/DSP
mode you want.
Ex.: When “DOLBY D” is selected for Dolby Digital multi-
channel software:
To cancel Surround/DSP modes
Turn MULTI JOG so that “SURR OFF” appears on the display.
NOTE
The initial setting is “AUTO SURR.”
*Available Surround modes vary depending on the incoming
signals. For details, see “Using the Surround/DSP modes” on
page 38.
When you select “AUTO SURR” (Auto Surround)
You can enjoy the Surround mode easily.
•For details about the Surround modes, see pages 34 to 36.
• When “AUTO SURR” is activated, the AUTO SR indicator lights
up on the display.
How does “AUTO SURR” work?
• If a multi-channel signal comes in, an appropriate Surround
mode will be selected automatically.
• If a Dolby Digital 2-channel or DTS 2-channel signal with
surround signal comes in, “PLII MOVIE” will be selected.
• If a Dolby Digital 2-channel or DTS 2-channel signal without
surround signal, or a Linear PCM signal comes in, “SURR
OFF (stereo)” will be selected.
NOTES
•“AUTO SURR” does not take effect in the following cases:
– While playing an analog source.
– While selecting one of the fixed digital decode modes—
“DOLBY D” or “DTS” (see page 13).
• While listening with the headphones, the 3D HEADPHONE
mode (see pages 36 and 37) is activated without respect to the
type of software played back.
• When “AUTO SURR” is selected, sound may not come out at
the beginning of playback. If it occurs, select a Surround mode
manually.
Activating the Surround/DSP modes
Available Surround/DSP modes vary depending on the incoming
signals. For details, see page 38.
Activating one of the Surround/DSP modes automatically
recalls the memorized settings and adjustments.
•To adjust the speaker output level, see page 29.
•To adjust the effect level for the DSP mode (except All
Channel Stereo mode,) see page 31.
•To add “wraparound” sound effect to “PLII MUSIC”
(PANORAMA control,) see page 31.
•To adjust the sound localization of the center channel
for “NEO:6 MUSIC” (center gain,) see page 31.
•To adjust the vertical localization of the center channel
for Surround/DSP modes (except “PLII MUSIC,” “PLIIx
MUSIC,” “Neo6: MUSIC,” and “ALL CH ST”) (center
alignment,) see page 31.
NOTES
•You cannot use any Surround/DSP modes when selecting “DVD
MULTI” as the playback source.
• The on-screen display appears on the TV screen to show the
Surround/DSP mode name for 5 seconds when you select the
Surround/DSP mode.
To cancel the function, set “SUPERIMPOSE” to
“SUPERIMPOSE: OFF” (see page 25).
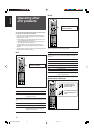
From the remote control:
1
Select and play any source other than “DVD
MULTI.”
• Make sure you have selected the input mode (analog or
digital) correctly.
2
Press SURROUND repeatedly to select the
Surround/DSP mode you want.
Ex.: When “DOLBY D” is selected for Dolby Digital multi-
channel software:
To cancel Surround/DSP modes
Press SURROUND repeatedly so that “SURR OFF” appears on
the display.
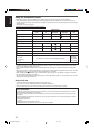
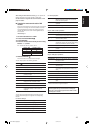
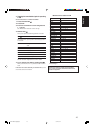
1, 3
2
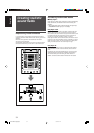
EQ
LPCM L
LS SB RS
S . WFR
PL
NEO : 6
DSP 3D
LFE
CR
DOLBY D
DTS AAC
96 / 24
AUTO SR
C.TONE VIRTUAL SB AUDIO P. BASS TA NEWS INFO RDS TUNED ST SLEEP
AUTO MUTING AUTO MODE
ATT
HP
MHz
kHz
HALL1 HALL2
THEATER1
THEATER2
(Back to the beginning)
LIVE CLUB
AUTO SURR
DANCE CLUB
PAVILION
ALL CH ST
MONO FILM
Surround modes*
SURR OFF
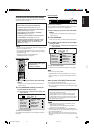
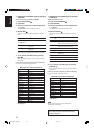
1
2
When operating the receiver
using the remote control, set the
mode selector to
“AUDIO/TV/VCR/DBS.”
EQ
LPCM L
LS SB RS
S . WFR
PL
NEO : 6
DSP 3D
LFE
CR
DOLBY D
DTS AAC
96 / 24
AUTO SR
C.TONE VIRTUAL SB AUDIO P. BASS TA NEWS INFO RDS TUNED ST SLEEP
AUTO MUTING AUTO MODE
ATT
HP
MHz
kHz
HALL1 HALL2
THEATER1
THEATER2
(Back to the beginning)
LIVE CLUB
AUTO SURR
DANCE CLUB
PAVILION
ALL CH ST
MONO FILM
Surround modes*
SURR OFF
EN34-39RXF31S[US]2.p65 05.4.23, 16:1839