


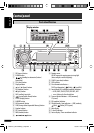
4
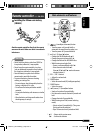
Connecting the external amplifier or subwoofer
/
µËÕ·Õ¡ª≈‘ø“¬‡ÕÕ√ÏÀ√◊Õ´—∫«Ÿø‡øÕ√ϥȓππÕ
B
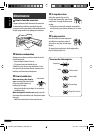
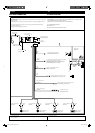
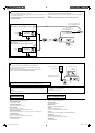
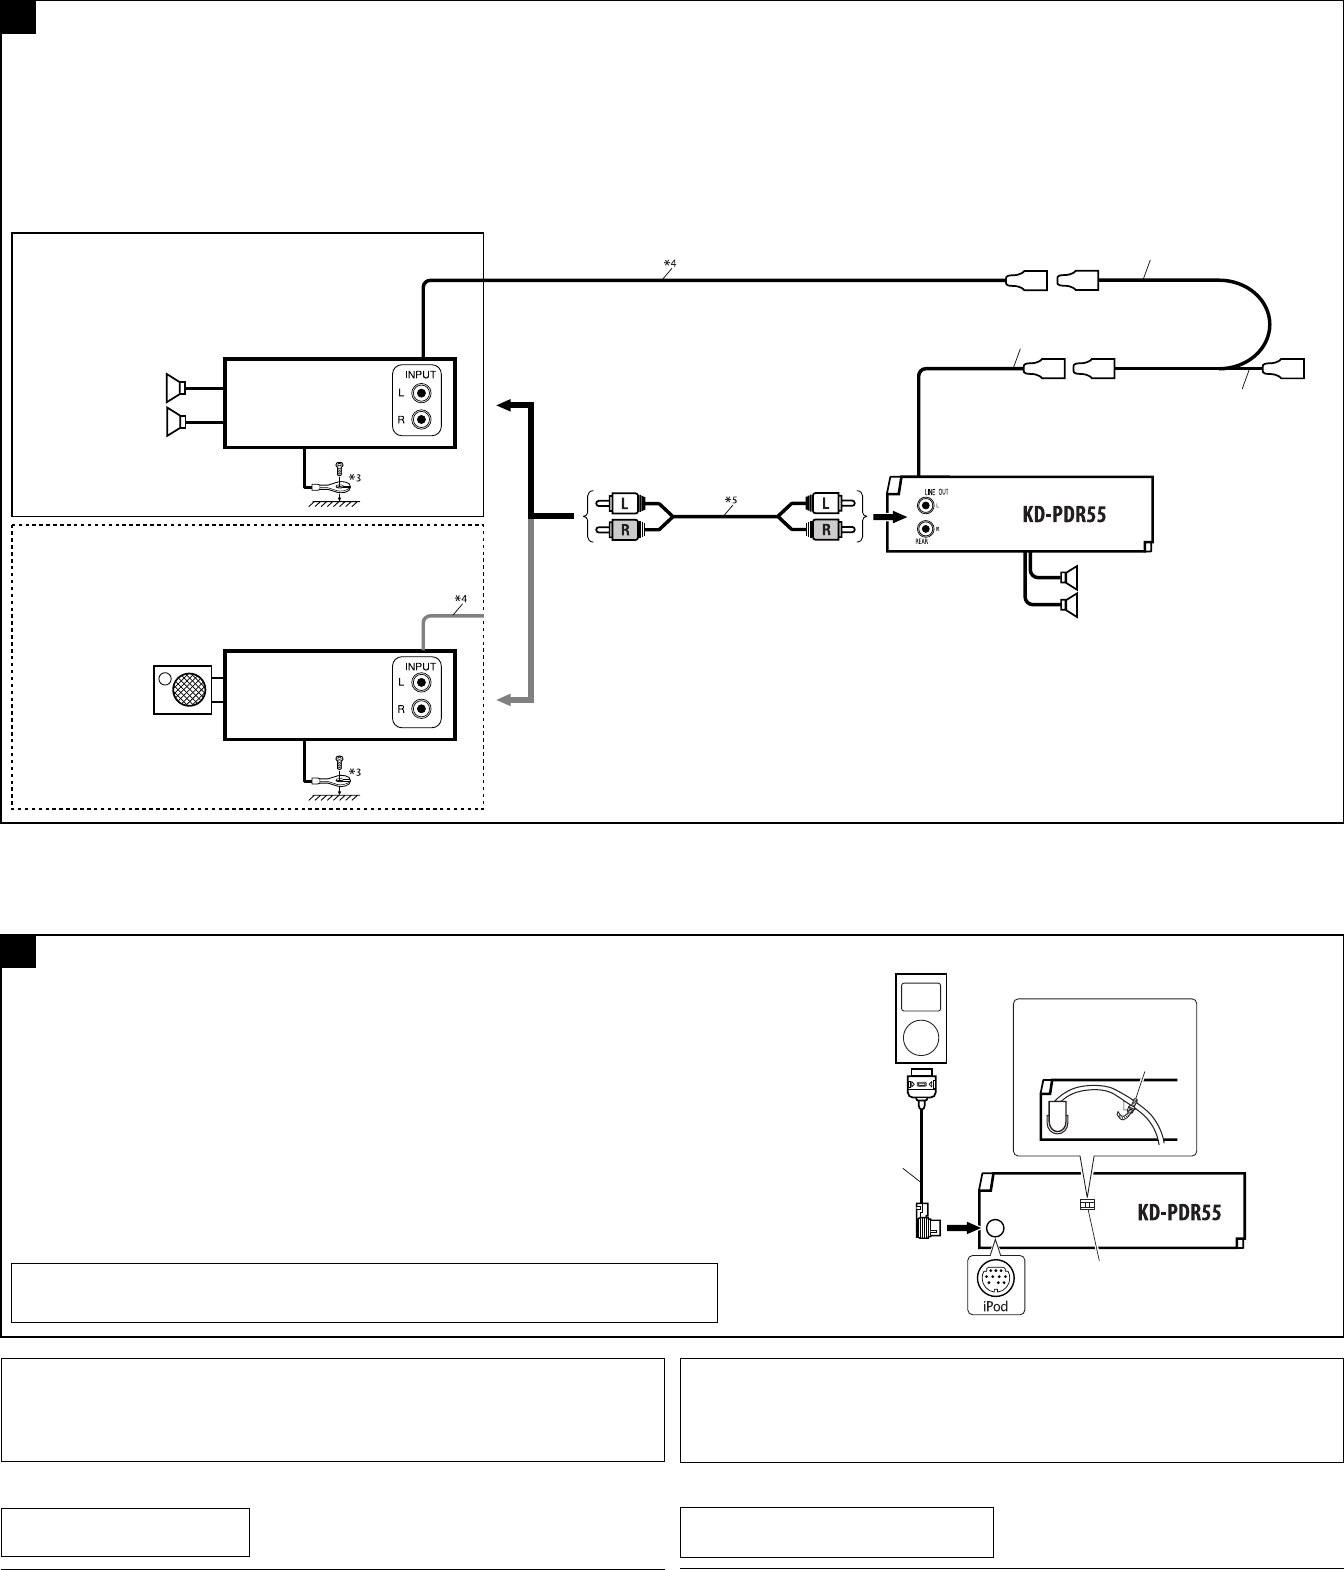
You can connect amplifier to upgrade your car stereo system.
• Connect the remote lead (blue with white stripe) to the remote lead of the other equipment so that it
can be controlled through this unit.
• Disconnect the speakers from this unit, connect them to the amplifier. Leave the speaker
leads of this unit unused.
Set “L/O MODE” to “WOOFER” (See page 14 of the
INSTRUCTIONS.)
µ—Èߧ˓ “L/O MODE” ‡ªìπ “WOOFER” (¥ŸÀπÈ“ 14 §”·π–π”)
*
3
Firmly attach the ground wire to the metallic body or to the chassis of the car—to the place uncoated with paint
(if coated with paint, remove the paint before attaching the wire). Failure to do so may cause damage to the
unit.
*
4
Remote lead.
*
5
Signal cord (not supplied for this unit).
TROUBLESHOOTING
• The fuse blows.
* Are the red and black leads connected correctly?
• Power cannot be turned on.
* Is the yellow lead connected?
• No sound from the speakers.
* Is the speaker output lead short-circuited?
• Sound is distorted.
* Is the speaker output lead grounded?
* Are the “–” terminals of L and R speakers grounded in common?
• Noise interfere with sounds.
* Is the rear ground terminal connected to the car’s chassis using shorter and thicker cords?
• This unit becomes hot.
* Is the speaker output lead grounded?
* Are the “–” terminals of L and R speakers grounded in common?
• This unit does not work at all.
* Have you reset your unit?
Set “L/O MODE” to “REAR” (See page 14 of the INSTRUCTIONS.)
µ—Èߧ˓ “L/O MODE” ‡ªìπ “REAR” (¥ŸÀπÈ“ 14 §”·π–π”)
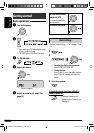
C
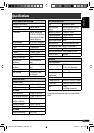
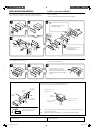
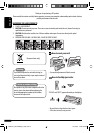
Connecting an Apple iPod
/
°“√‡™◊ËÕ¡µËÕ°—∫ Apple iPod
You can connect an iPod to this unit using the supplied connection cable for iPod.
Fasten the connection cable for iPod tightly across the loop using the supplied cable tie
to hold the connection cable in place.
∑Ë“π“¡“√∂µËÕ‡§√◊ËÕ߇≈Ëπ iPod °—∫‡§√◊ËÕ߇≈Ëππ’ȉ¥È‚¥¬„™È“¬‡§‡∫‘≈∑’Ë¡“°—∫‡§√◊ËÕß iPod ¬÷¥“¬‡§‡∫‘≈”À√—
∫‡™◊ËÕ¡µËÕ
iPod ‡¢È“°—∫ÀË«ß„ÀÈ·πËπ‚¥¬„™È“¬√—¥“¬‰ø∑’Ë„ÀÈ¡“¬÷¥“¬‡§‡∫‘≈„ÀÈÕ¬ŸË°—∫∑’Ë
§ÿ≥“¡“√∂µËÕ°—∫·Õ¡æ≈‘ø“¬‡ÕÕ√Ï ‡æ◊ËÕ‡æ‘Ë¡§ÿ≥ ¿“懒¬ß„ÀÈ°—∫√–∫∫‡µÕ√‘‚Õ¢Õß√∂¬πµÏ
• µËÕ“¬µ–°—Ë«√–¬–‰°≈ (’πÈ”‡ß‘π≈“¬¢“«) ‡¢È“°—∫“¬µ–°—Ë«√–¬–‰°≈¢ÕßÕÿª°√≥ÏÕ◊Ëπ Ê ‡æ◊ËÕ®–“¡“√∂§«∫§ÿ¡‚¥¬™ÿ¥ª√–
°Õ∫π’ȉ¥È
• ∂Õ¥≈”‚æßÕÕ°®“°™ÿ¥ª√–°Õ∫π’È ·≈È«µËÕ‡¢È“°—∫‡§√◊ËÕߢ¬“¬ ∑‘Èß“¬µ–°—Ë«≈”‚æߢÕß™ÿ¥ª√–°Õ∫π’ȉ«È
Rear speakers
≈”‚æßÀ≈—ß
JVC Amplifier
‡§√◊ËÕߢ¬“¬‡’¬ß JVC
JVC Amplifier
‡§√◊ËÕߢ¬“¬‡’¬ß JVC
Subwoofer
´—∫«Ÿø‡øÕ√Ï
or
À√◊Õ
Y-connector (not supplied for this unit)
¢ÈÕµËÕ√Ÿªµ—« Y (‰¡Ë‰¥È„ÀÈ¡“°—∫™ÿ¥ª√–°Õ∫π’È)
Remote lead (Blue with white stripe)
“¬µ–°—Ë«•–¬–‰°• (’πÈ”‡ß‘π≈“¬¢“«)
To the remote lead of other equipment or automatic antenna if any
µËÕ“¬°—∫Õÿª°√≥ÏÕ◊ËπÀ√◊Õ‡“Õ“°“»Õ—µ‚π¡—µ‘∂È“¡’
Front speakers
≈”‚æßÀπÈ“
iPod is a trademark of Apple Computer, Inc., registered in the U.S. and other countries.
iPod ‡ªÁπ‡§√◊ËÕßÀ¡“¬°“√§È“¢Õß Apple Computer, Inc. ´÷Ëß®¥∑–‡∫’¬π°“√§È“„πª√–‡∑»À√—∞Õ‡¡√‘°“·≈–ª√–‡∑»Õ◊ËπÊ
*
3
µËÕ≈«¥
“¬¥‘π„ÀÈ·πËπ‡¢È“°—∫µ—«∂—߇À≈Á° À√◊Õµ—«∂—ß√∂
—
µ√ß
Ë«π ∑’ˉ¡Ë¡’
’‡§≈◊Õ∫ (À“°¡’
’‡§≈◊Õ∫Õ¬ŸË „ÀÈ¢Ÿ¥
’ÕÕ°°ËÕπ °ËÕπµËÕ≈«¥
“¬¥‘π)
À“°‰¡ËªØ‘∫—µ‘µ“¡§”·π–π”π’È ‡§√◊ËÕßÕ“®™”√ÿ¥À√◊Õ‡
’¬À“¬‰¥
*
4
“¬µ–°—Ë«•–¬–‰°•
*
5
“¬‡§‡∫‘≈—≠≠“≥ (‰¡Ë‰¥È„ÀÈ¡“°—∫™ÿ¥ª√–°Õ∫π’È)
°“√µ√«®Õ∫ªí≠À“¢—¥¢ÈÕß
• øî«Ï¢“¥
* ¡’°“√‡™◊ËÕ¡ “¬µ–°—Ë«’¥”·≈–’·¥ßլ˓ß∂Ÿ°µÈÕßÀ√◊Õ‰¡Ë
• ‰¡Ë“¡“√∂‡ªî¥‡§√◊ËÕ߉¥È
* ¡’°“√‡™◊ËÕ¡“¬µ–°—Ë«’‡À≈◊ÕßÀ√◊Õ‰¡Ë
• ‰¡Ë¡’‡’¬ßÕÕ°®“°≈”‚æß
* “¬µ–°—Ë«Ë«π∑’ËÕÕ°∑“ß≈”‚æ߇°‘¥‰øøÈ“≈—¥«ß®√À√◊Õ‰¡Ë
• ‡’¬ß‡æ’Ȭπ
* “¬µ–°—Ë«Ë«π∑’ËÕÕ°∑“ß≈”‚æßµËÕ≈ߥ‘πÀ√◊Õ‰¡Ë
* “¬¢—È«≈∫ “–” ¢Õß≈”‚æߥȓπ´È“¬·≈–¢«“µËÕ≈ߥ‘πµ“¡ª°µ‘À√◊Õ‰¡Ë
• ‡’¬ß√∫°«π
* ¡’°“√„™È“¬—ÈπÊ À√◊ÕÀπ“Ê µËÕ®“°‡§√◊ËÕß«π∑’˵‘¥µ—Èß ‰«È∫πæ◊Èπ¥È“πÀ≈—ß°—∫µ—«∂—ß√∂¬πµÏÀ√◊Õ‰¡Ë
• ™ÿ¥ª√–°Õ∫√ÈÕπ¢÷Èπ
* “¬µ–°—Ë«Ë«π∑’ËÕÕ°∑“ß≈”‚æßµËÕ≈ߥ‘πÀ√◊Õ‰¡Ë
* “¬¢—È«≈∫ “–” ¢Õß≈”‚æߥȓπ´È“¬·≈–¢«“µËÕ≈ߥ‘πµ“¡ª°µ‘À√◊Õ‰¡Ë
• ‡§√◊ËÕß√—∫π’È∑”ß“π‰¡
* ∑Ë“π‰¥Èµ—È߇§√◊ËÕß„À¡Ë·≈È«À√◊Õ¬—ß
Connection cable for iPod (supplied)
“¬‡™◊ËÕ¡µËÕ”À√—∫ iPod (¡’¡“„ÀÈ)
Apple iPod
(separately purchased)
Apple iPod
(·¬°®”ÀπË“¬)
Cable tie
“¬√—¥“¬‰ø
Loop
ÀÉ«ß
Install2_KD-PDR55_006A_TH.indd 4Install2_KD-PDR55_006A_TH.indd 4 12/8/06 2:20:08 PM12/8/06 2:20:08 PM