


15
III) CASSETTE RECORDING
1) Press the TAPE function button to enter “TAPE“ mode. Get the tape ready for playback.
2) Press “REC
“ button and then the CD “PLAY/PAUSE ” button at CD-2 until the recording
indicator “
“ shows on LCD display.
3) After few seconds, the LCD will show the time counter and now the system is start recording
process. Insert the cassette tape to start playback.
4) During the recording, you can record the desired session by pressing the track separation
“
” button. A new CD track will be created and continue recording the next session (track).
5) After completion of recording, press the “STOP
” button at CD-2 and then stop the playback
of the cassette tape.
IV) AUX-IN RECORDING
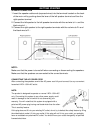
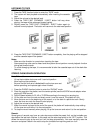
1) Press the “CD 1/AUX“ button to enter AUX-IN mode. Connect the headphone output at the
audio device (such as mp3 player and CD player) to the 3.5mm AUX-IN jack via a 3.5 mm
connecting cable (not provided).
2) Repeat the same procedures from step 2 to 5 as described on other recording modes from
above.
3) Adjust the volume output level at your audio player device if the recording level is too high.
REMARK:
- This unit supports 1X recording speed which is in synchronization with the actual playing time
of the source.
- When you press the “PLAY/PAUSE
” button on CD-2 during the recording, a
“busy“ message will briefly appear on the LCD display and the recording is paused. To start
recording a new track, press the “PLAY/PAUSE
” button again, the recording indicator “
“ will show on the LCD display.
- To enable recording in different modes, you must press the CD-2 “STOP ” button to exit
before you switch from one mode to another mode.
B) RECORDING SETTING
I) RECORDING LEVEL
The preset recording level of the system is lower than original music source in order to avoid
distortion during recording except AUX-IN recording mode. The record level can be adjusted by
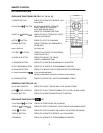
pressing the “REC LEVEL + / -“ buttons on the remote control. You are recommend to try a short
recording to determine that no distortion will occur after adjust the recording level.
II) MANUAL TRACK SEPARATION
You can divide the recording into separate tracks at anytime. When you press the “TRACK
SEPARATE
“ button once while recording in any mode, the system will generate a new track
and then continue the recording of the new track in few seconds. A “busy“ message will briefly
show on LCD display, it means the unit is creating a new track.
III) FINALIZE A CD-R/RW DISC
You must convert the CD-R/RW disc into standard CD before playing at other audio CD player. This
process is knows as finalizing and a table of contents (TOC) will be written to the CD at the same
time:
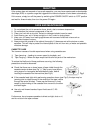
1. Press the “CD 2” function button to enter the CD-2 mode and place the CD-R/RW disc you are
going to finalize in CD-2 compartment.
2. Press the FINALIZE button during CD stop mode, “FIN-d “ message will appear on the LCD
display. Press the “ STOP
” button to quit finalize mode if necessary.
3. Press the “PLAY/PAUSE
” button to start finalizing and the LCD will show “busy “ during
the process.
4. After completion, the CD tray will open automatically and the “NO TOC “ indicator will
disappear from LCD display when you load the disc that has been finalized.