


E-9
SETTING THE CLOCK
The clock has to be set before using the system for the first time. When you connect the System to the AC outlet
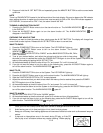
for the first time the clock display will show "12:00" with the colon flashing and will need to be set. For example
set the clock time at 7:30 AM.
1. Press and hold the TIME button and repeatedly press the HOUR button to set the
correct Hour.
2. Press and hold the TIME button and repeatedly press the MIN button to set the correct
Minute.
NOTE
There is a PM INDICATOR located on the left-hand side of the clock display. Be sure to observe the PM
indicator when setting the time to make sure the time is set correctly for AM or PM. If the PM indicator appears,
the time displayed is "PM". If the PM indicator is not shown, the time displayed is "AM ".
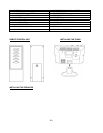
RADIO OPERATION
1. To turn the radio on, press the POWER BUTTON once. The LCD DISPLAY lights up.
2. Slide the FUNCTION SELECTOR to the “RADIO” position.
3. Slide the BAND SELECTOR to your desired band (AM, FM or FM ST.).
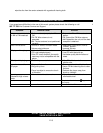
4. Turn the TUNING CONTROL to your desired radio station. The radio frequency
appears in the LCD DISPLAY.
5. Adjust the sound level by pressing the VOLUME buttons (+/-).
6. To turn off the radio, press the POWER BUTTON again. The LCD DISPLAY will go
“off”.
FM STEREO RECEPTION
With the BAND SELECTOR in the “FM ST” position, the FM Stereo Indicator “ST” will light up when listening to a
strong station that is broadcasting in “Stereo”.
Slide the BAND SELECTOR to the FM position when the FM stereo reception is weak. The reception may be
improved, but the sound is monaural (MONO).
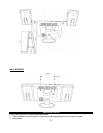
TIPS FOR BEST RECEPTION
AM – The AM antenna is located inside the cabinet of the main unit. If AM reception is weak, change the
position of cabinet until the internal antenna picks up the strongest signal,
FM – During FM reception, always keep the FM Wire Antenna fully extended. If FM reception is weak try
repositioning the FM Wire Antenna until you find the strongest signal.
CD PLAYER OPERATION
NOTE: This unit not only plays commercial compact discs but also self-compiled CD-RW discs.
• Because of non-standardized format definition/production of CD-R/RW, playback quality & performance
is not guaranteed.
• Manufacturer is not responsible for the playability of CD-R/RW due to recording conditions such as PC
performance, writing software, media properties etc.
• Do not attach a label or seal to either side of the CD-R/RW disc. It may cause a malfunction.
PLAY MODE
1. Turn on the Music System by pressing the POWER BUTTON. The LCD DISPLAY goes “On”.
2. Slide the FUNCTION SELECTOR to the “CD” position. Flashing “- -” will be displayed in the LCD DISPLAY
while the Player is reading the table of contents (TOC) on the CD.
“no” will be displayed if no disc is loaded.
3. Open the CD DOOR by pressing the CD DOOR at the “OPEN/CLOSE” mark located on the CD door, load a
CD with the label side facing upward and then close the CD door.
4. Playback will start from track 1 once the Player has finished reading the TOC. The PLAY/PAUSE
INDICATOR “f” will appear steadily on the LCD DISPLAY.