


WARNING!
NEVER USE A TELESCOPE OR CAMERA TO LOOK AT THE SUN
WITHOUT A PROPER FILTER!
Looking at or near the Sun will cause instant and irreversible damage to your eye.
Children should always have adult supervision while observing.
1. SkyGuider
TM
Tracking Equatorial
Mount Overview
Thank you for choosing the new iOptron SkyGuider
TM
Tracking equatorial mount for astrophotography. This
portable mount makes it easy to take long exposures of
the night sky without streaking or star trailing.
The SkyGuider
TM
mount is simple to set up. Just attach
the mount to a tripod. Mount your digital camera or
lightweight scope onto the mount and balance it. Align
the mount to the Pole Star using the included
AccuAligning
TM
dark field illuminated polar scope and an
optional smart phone App. Then turn on the motor and it
will keep your camera tracking at the same speed the
earth rotates. The unique DC servo motor keeps your
camera in motion to avoid star trails and allows you to
take long exposures for beautiful images of the night
sky. A built-in ST-4 compatible guide port will enable you
to use autoguiding and make the tracking even better!
Features:
• Accepts cameras weighing up to 11 lbs (5 kg)
• Capable for dual mount application up to 11 lbs
(5kg) + 7.7lbs (3.5kg), balanced
• Spring loaded gear system with customer adjustable
loading force
• Auto-tracking for smooth camera motion perfect for
long-term exposures
• Four pre-set tracking speeds with northern/southern
hemisphere selection
• Includes iOptron AccuAligning
TM
dark-field
illuminated polar scope for Quick Polar Alignment
• Built-in ST-4 compatible guide port
• Padded carry bag included
• 1.5” stainless steel short field tripod with padded
carry bag (#3500 only)
• Optional ball heads available separately (#3305)
• Optional AC/DC adapter (#8417)
• Optional 1.5” stainless steel regular height tripod
(#3521)
DO NOT hold and swing the counterweight shaft
rigorously. This will degrade the performance of the
spring loaded gear meshing system and possibly
damage it.
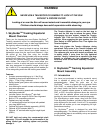
The Tension Adjuster is used as the last step to
lock, and the first step to release the gears. When
disengaging the gear system, release the Tension
Adjuster first. Then turn the Gear Switch to OPEN
position. When engaging the gear system, turn the
Gear Switch to LOCK position first. Then tighten the
Tension Adjuster.
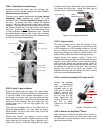
Never fully tighten the Tension Adjusters during
operations. Fully screw in the Tension Adjuster and
then back out by from half a turn to about 2 turns.
The optimum spot varies with actual conditions, but
is mostly within 2 turns from the fully tightened
position. Ideally, it should be at a position just deep
enough to eliminate any free movement (“play”),
while any force on the worm assembly is kept at a
minimum.
2. SkyGuider
TM
Tracking Equatorial
Mount Assembly
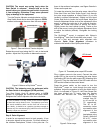
2.1. Introduction
You have just purchased a tracking equatorial mount
that is capable of taking you to a new level of
astrophotography. When the polar axis of the
SkyGuider
TM
mount is aligned with the celestial North
Pole (CNP), or celestial South Pole (CSP), the mount
will evenly match the Earth’s rotation against the sky.
Since all celestial objects appear to rotate around the
CNP, or CSP—the polar alignment allows the mount to
“track” with the celestial sphere and provide accurate
tracking for visual observations and astrophotography.
The AccuAligning
TM
polar scope, along with the Quick
Polar Alignment procedure, provides a fast and accurate
polar alignment for the mount. A built-in ST-4 compatible
guide port will enable you to use autoguiding for high-
performance tracking.
The SkyGuider
TM
mount is designed for wide field
astrophotography. The following sections of this manual
provide detailed steps to successfully set up and operate
the SkyGuider
TM
mount.