


13
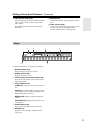
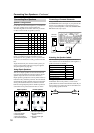
Remote Controller—Continued
For detailed information, see the pages in parentheses.
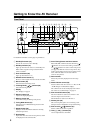
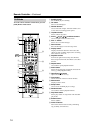
A Standby button (37)
Sets the AV receiver to Standby.
B On button (37)
Turns on the AV receiver.
C Input Selector buttons (46)
Used to select the input sources.
D Multi CH button (53)
Selects the multichannel DVD input.
E Dimmer button (54)
Adjusts the display brightness.
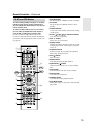
F Arrow [ ]/[ ]/[ ]/[ ] and Enter buttons
Used to select and adjust settings.
G CH +/– button (52)
Selects radio presets.
H Return button
Returns to the previous display when changing set-
tings.
I Display button (55)
Displays various information about the currently
selected input source.
J Listening Mode buttons (56)
Used to select the listening modes. The [Stereo],
[Surround], and Listening Mode [ ]/[ ] buttons
can be used regardless of the currently selected
remote controller mode.
K Test Tone, CH Sel, Level-, and Level+
buttons (54, 69)
Used to adjust the level of each speaker.
L Light button
Turns the remote controller’s illuminated buttons on
or off.
M Macro buttons (88)
Used with the Macro function.
N Zone 2 button (80)
Used when setting the volume and input source for
Zone 2.
O Remote Mode buttons (12)
Used to select the remote controller modes. When a
remote controller button is pressed, the Remote
Mode button of the currently selected mode lights
up.
P Sleep button (55)
Used with the Sleep function.
Q Menu button (on North American model)
Selects the search mode for XM Satellite Radio.
R VOL [ ]/[ ] button (46)
Adjusts the volume of the AV receiver regardless of
the currently selected remote controller mode.
S Setup button
Used to change settings.
T Muting button (54)
Mutes or unmutes the AV receiver.
U Re-EQ button (62)
Turns the Re-EQ function on or off.
V L Night button (64)
Turns the Late Night function on or off.
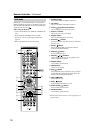
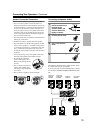
■ Tape mode
On twin cassette decks, only Deck B can be controlled.
1 Previous and Next [ ]/[ ] buttons
The Previous [ ] button selects the previous
track. During playback it selects the beginning of
the current track. The Next [ ] button selects the
next track.
Depending on how they were recorded, the Previous
and Next [ ]/[ ] buttons may not work prop-
erly with some cassette tapes.
Play [ ] button
Starts playback.
Rewind and FF [ ]/[ ] buttons
The Rewind [ ] button starts rewind. The FF
[] button starts fast forward.
Reverse Play [ ] button
Starts reverse playback.
Stop [ ] button
Stops playback.
Rec [ ] button
Starts recording.