


6. Re-float the TONE ARM (9) to ensure horizontal zero (0) balance. If
zero balance has not been maintained, repeat counterweight steps 3 - 5.
7. After adjusting the horizontal zero (0) balance, turn the balanced
COUNTERWEIGHT (10) counter clockwise until the cartridge manufac-
turer’s recommend stylus pressure appears on the STYLUS PRES-
SURE RING (11) where it meets the center line of the TONE ARM (9)
rear shaft.
ADJUSTING THE ANTI-SKATING CONTROL:
Set the ANTI-SKATING CONTROL (14) to the same value as the stylus
pressure.
NOTE: IF YOUR TURNTABLE CAME WITH A CN-1000 CARTRIDGE, IT HAS A RECOM-
MENDED TRACKING FORCE OF 3.0 GRAMS AND CAN HAVE RANGE FROM 2.5-3.5
GRAMS.
CONNECTIONS:
1. Plug the AC power plug into an appropriate outlet.
2. See Table A for proper connection of the output RCA plugs and
ground connector. Make sure that all the plugs are firmly plugged into the
appropriate jacks (phono inputs).
NOTE: TO REDUCE HUM, MAKE SURE THE GROUND LUG IS FIRMLY CONNECTED TO
THE GROUND SCREW.
TABLE A:
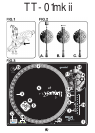
OPERATING INSTRUCTIONS:
BASIC OPERATION:
1. Place a record on the SLIPMAT (6) which sits on the PLATTER (2).
2. Select the desired speed by depressing the 33 or 45 SPEED SELEC-
TOR (18) button.
3. Turn the POWER (15) switch to the “ON” position, at which point the
TARGET LIGHT (16) will light up, TARGET LIGHTS are an optional
accessory available at your local retailer.
4. Remove the stylus protector (if applicable to your cartridge).
5. Release the ARM CLAMP (12) found on the ARM REST (13).
6. Push the START/STOP (17) button. The turntable PLATTER (2) will
start to spin.
7. Carefully position the tone arm over the desired position over the
record. Lower the TONE ARM (9) slowly, while letting go of the TONE
ARM (9) over the record where you want to play.
8. When play is over, raise the TONE ARM (9), move it onto the ARM
REST (13), and secure it with the ARM CLAMP (12).
9. You now have the option of turning off the power by turning the
POWER (15) switch to the “OFF” position, or stopping the PLATTER (2)
by pushing the START/STOP (17) button.
INTERRUPTING PLAY:
1. Pushing the START/STOP (17) button will cause the record to stop
exactly when the START/STOP (17) button is pressed while playing.
2. Press the START/STOP (17) button again to start playback with a
short DELAY effect.
ADJUSTING THE PITCH CONTROL:
1. The TT-01MKII is equipped with a PITCH CONTROL (19). When the
PITCH CONTROL (19) is in the center position, the speed will be 33 or
45 depending on which SPEED SELECTOR (18) button is pushed.
2. When the PITCH CONTROL (19) is positioned off center, the pitch
can vary ±10% depending on the position of the PITCH CONTROL (19).
SPECIFICATIONS:
TURNTABLE SECTION:
Type..................................................................Belt Drive Manual Turntable
Drive Method.................................................................................Belt Drive
Motor..............................................................................................DC Motor
Speed................................................................................33 1/3 or 45 RPM
Wow and Flutter...................................................Less than 0.25% WRMS*
*THIS RATING REFERS TO THE TURNTABLE ASSEMBLY AND PLATTER ONLY AND
EXCLUDES EFFECTS OF RECORDS, CARTRIDGES OR TONEARMS.
TONEARM SECTION:
Type....................................................Statically Balanced Straight Tonearm
Headshell Weight..................................................................................5.6 g
GENERAL:
Power Supply................................................AC 115 V~60 Hz/230 V~50 Hz
Power Consumption................................................................................5 W
Dimensions.....................................................................17.75" x 5.75" x 14"
....................................................................................(450 x 136 x 352 mm)
Weight....................................................................................8 lbs. (3.75 kg)
SPECIFICATIONS ARE SUBJECT TO CHANGE WITHOUT NOTICE. THE WEIGHT AND
DIMENSIONS SHOWN ARE APPROXIMATE.
(5)
OUTPUT CONNECTORS MIXER OR RECIEVER
L (WHITE) PHONO L CHANNEL
R (RED) PHONO R CHANNEL
GND (SPADE LUG) GND SCREW